box around text button when testing in Android

I have a button that has a white rectangle behind it when testing in Android.  I looked through the forums and found one that said the “boolean” needs to be set to “True”.  There is no reference to “boolean”  in my code.  I have put 

boolean = true

in several spots.  It either returns an error or does nothing.  I have it on a reset button.

local function resetGame() for i = 1, #spots do spots[i].moveText.text = " " spots[i].moveType = nil end display.remove( winningLine ) winningLine = nil display.remove( winningText ) winningText = nil display.remove( winningText2 ) winningText2 = nil display.remove( resetButton ) resetButton = onPress player = "X" allowMoves = true end

and

resetButton = widget.newButton({ label = "Reset", x = display.contentCenterX +120, y = display.contentHeight -320, font = native.systemFontBold, fontSize = 20, labelColor = { default = { 1,1,1, 0.1}, over = { 1, 0, 0 } }, onPress = resetGame }) end

Where does it go, how do I set it, or is this even what needs to be done?

I’m not clear what you want here.  Do you want a rectangle or do you not want a rectangle.
 
A good way to write posts when you’ve encountered a problem is to use this format:
 

  1. What you did.

  2. What you expected to see.

  3. What you saw.

  4. Why you think it is wrong.

One more note.

While I’m willing to code up examples sometimes, in cases like this I’d like to have something I can download and run.

I much prefer it when folks do the following:

  1. Supply the list I mentioned above.

  2. Create a TINY project that demonstrates just the issue they are having problems with.

  3. Zip that project up and attach it to a post using the ‘more reply options’ button below.

This saves me, the person trying to help, a lot of time and by following all these steps reduces ambiguity.

There is a side benefit to doing this. Often, while spending time to make a small and clear example of the issue, you will discover the source of the issue and no longer need to post for help.

I think you may have misunderstood what a boolean is. Booleans are variables which can contain only two values, such as true or false.

The documentation for widget.newButton lists 3 optional options which use boolean data types, there are: isEnabled, emboss and textOnly. In other words, you may set the option “isEnabled” to true or false, i.e. does the button work or not. In your case, if you set the option “textOnly = true,” then you should only see the text, if this is what you wanted… is it?

Now, even in the unlikely event that you did find what you were looking for in my answer, you (and everyone else) should really follow Ed’s format, i.e. write your posts using structure.

  1. What you did.
  2. What you expected to see.
  3. What you saw.
  4. Why you think it is wrong. 

This way, it’ll be easy for others to jump in and help you and no one has to make any guesses as to what the problem even is. Help others help you! :stuck_out_tongue:

Here is my code

----------------------------------------------------------------------------------------- -- -- main.lua -- ----------------------------------------------------------------------------------------- -- Your code here local widget = require( "widget" ) local winningLine local winningText local resetButton local allowMoves = true local spots = {} local player = "X" -- Player X goes first local winPatterns = {} winPatterns[1] = { 1, 2, 3, 4, 5 } -- horizontal row 1 winPatterns[2] = { 6, 7, 8, 9, 10 } -- horizontal row 2 winPatterns[3] = { 11, 12, 13, 14, 15 } -- horizontal row 3 winPatterns[4] = { 16, 17, 18, 19, 20 } -- horizontal row 4 winPatterns[5] = { 21, 22, 23, 24, 25 } -- horizontal row 5 winPatterns[6] = { 1, 6, 11, 16, 21 } -- vertical column 1 winPatterns[7] = { 2, 7, 12, 17, 22 } -- vertical column 2 winPatterns[8] = { 3, 8, 13, 18, 23 } -- vertical column 3 winPatterns[9] = { 4, 9, 14, 19, 24 } -- vertical column 4 winPatterns[10] = { 5, 10, 15, 20, 25 } -- vertical column 5 winPatterns[11] = { 1, 7, 13, 19, 25 } -- top left to bottom right diagonal winPatterns[12] = { 21, 17, 13, 9, 5 } -- bottom left to top right diagonal local function resetGame() for i = 1, #spots do spots[i].moveText.text = " " spots[i].moveType = nil end display.remove( winningLine ) winningLine = nil display.remove( winningText ) winningText = nil display.remove( winningText2 ) winningText2 = nil display.remove( resetButton ) resetButton = onPress player = "X" allowMoves = true end local function gameOver( winningMove, currentPlayer ) -- lets draw a line thru the winning numbers allowMoves = false if winningMove then local startX = spots[winPatterns[ winningMove][1] ].x local startY = spots[winPatterns[ winningMove][1] ].y local endX = spots[winPatterns[ winningMove][5] ].x local endY = spots[winPatterns[ winningMove][5] ].y winningLine = display.newLine( startX, startY, endX, endY ) winningLine:setStrokeColor( 1, 0, 0, 0.5 ) winningLine.strokeWidth = 50 winningText = display.newText( "Bingo!", display.contentCenterX -50, display.contentHeight, display.contentCenterY -50, display.contentWidth +320, native.systemFontBold, 15) winningText2 = display.newText( "Bingo!", display.contentCenterX -50, display.contentHeight, display.contentCenterY -50, display.contentWidth +350, native.systemFontBold, 15) end resetButton = widget.newButton({ label = "Reset", x = display.contentCenterX +120, y = display.contentHeight -320, font = native.systemFontBold, fontSize = 20, labelColor = { default = { 1,1,1}, over = { 1, 0, 0 } }, onPress = resetGame }) end local function isGameOver( currentPlayer ) local isWinner = false for i = 1, #winPatterns do if spots[winPatterns[i][1]].moveType == currentPlayer and spots[winPatterns[i][2]].moveType == currentPlayer and spots[winPatterns[i][3]].moveType == currentPlayer and spots[winPatterns[i][4]].moveType == currentPlayer and spots[winPatterns[i][5]].moveType == currentPlayer then -- we have a winner! isWinner = true gameOver( i, currentPlayer ) break end end end local function handleMove( event ) if event.phase == "began" then if event.target.moveType == nil and allowMoves then event.target.moveText.text = player event.target.moveType = player isGameOver( player ) end end return true end local VerticalLine1 = display.newRect( display.contentCenterX - 150, display.contentCenterY + 85, 5, 305 ) VerticalLine1:setFillColor( 0.1, 0.1, 0.1 ) local VerticalLine2 = display.newRect( display.contentCenterX - 90, display.contentCenterY + 85, 5, 305) VerticalLine2:setFillColor( 0.1, 0.1, 0.1 ) local VerticalLine3 = display.newRect( display.contentCenterX - 30, display.contentCenterY + 85, 5, 305 ) VerticalLine3:setFillColor( 0.1, 0.1, 0.1 ) local VerticalLine4 = display.newRect( display.contentCenterX +30, display.contentCenterY + 85, 5, 305 ) VerticalLine4:setFillColor( 0.1, 0.1, 0.1 ) local VerticalLine5 = display.newRect( display.contentCenterX +90, display.contentCenterY + 85, 5, 305 ) VerticalLine5:setFillColor( 0.1, 0.1, 0.1 ) local VerticalLine6 = display.newRect( display.contentCenterX +150, display.contentCenterY + 85, 5, 305 ) VerticalLine6:setFillColor( 0.1, 0.1, 0.1 ) local HorizontalLine1 = display.newRect( display.contentCenterX, display.contentCenterY -80, 305, 35 ) HorizontalLine1 : setFillColor( 0, 0, 0 ) local HorizontalLine2 = display.newRect( display.contentCenterX, display.contentCenterY -5, 300, 5 ) HorizontalLine2:setFillColor( 0.1, 0.1, 0.1 ) local HorizontalLine3 = display.newRect( display.contentCenterX, display.contentCenterY + 55, 300, 5 ) HorizontalLine3:setFillColor( 0.1, 0.1, 0.1 ) local HorizontalLine4 = display.newRect( display.contentCenterX, display.contentCenterY + 115, 300, 5 ) HorizontalLine4:setFillColor( 0.1, 0.1, 0.1 ) local HorizontalLine5 = display.newRect( display.contentCenterX, display.contentCenterY + 175, 300, 5 ) HorizontalLine5:setFillColor( 0.1, 0.1, 0.1 ) local HorizontalLine6 = display.newRect( display.contentCenterX, display.contentCenterY + 235, 300, 5 ) HorizontalLine6:setFillColor( 0.1, 0.1, 0.1 ) local myText = display.newText( "B", 0, 0, native.systemFontBold, 60 ) myText:setFillColor( 0.1, 0.1, 0.1, 0.5 ) myText.anchorX = 0 myText.x = 20 myText.y = 205 local myText = display.newText( "B", 0, 0, native.systemFontBold, 60 ) myText:setFillColor( 0.1, 0.1, 0.1, 0.5 ) myText.anchorX = 0 myText.x = 20 myText.y = 265 local myText = display.newText( "B", 0, 0, native.systemFontBold, 60 ) myText:setFillColor( 0.1, 0.1, 0.1, 0.5 ) myText.anchorX = 0 myText.x = 20 myText.y = 325 local myText = display.newText( "B", 0, 0, native.systemFontBold, 60 ) myText:setFillColor( 0.1, 0.1, 0.1, 0.5 ) myText.anchorX = 0 myText.x = 20 myText.y = 385 local myText = display.newText( "B", 0, 0, native.systemFontBold, 60 ) myText:setFillColor( 0.1, 0.1, 0.1, 0.5 ) myText.anchorX = 0 myText.x = 20 myText.y = 445 local myText = display.newText( "I", 0, 0, native.systemFontBold, 60 ) myText:setFillColor( 0.1, 0.1, 0.1, 0.5 ) myText.anchorX = 0 myText.x = 90 myText.y = 205 local myText = display.newText( "I", 0, 0, native.systemFontBold, 60 ) myText:setFillColor( 0.1, 0.1, 0.1, 0.5 ) myText.anchorX = 0 myText.x = 90 myText.y = 265 local myText = display.newText( "I", 0, 0, native.systemFontBold, 60 ) myText:setFillColor( 0.1, 0.1, 0.1, 0.5 ) myText.anchorX = 0 myText.x = 90 myText.y = 325 local myText = display.newText( "I", 0, 0, native.systemFontBold, 60 ) myText:setFillColor( 0.1, 0.1, 0.1, 0.5 ) myText.anchorX = 0 myText.x = 90 myText.y = 385 local myText = display.newText( "I", 0, 0, native.systemFontBold, 60 ) myText:setFillColor( 0.1, 0.1, 0.1, 0.5 ) myText.anchorX = 0 myText.x = 90 myText.y = 445 local myText = display.newText( "N", 0, 0, native.systemFontBold, 60 ) myText:setFillColor( 0.1, 0.1, 0.1, 0.5 ) myText.anchorX = 0 myText.x = 140 myText.y = 205 local myText = display.newText( "N", 0, 0, native.systemFontBold, 60 ) myText:setFillColor( 0.1, 0.1, 0.1, 0.5 ) myText.anchorX = 0 myText.x = 140 myText.y = 265 local myText = display.newText( "N", 0, 0, native.systemFontBold, 60 ) myText:setFillColor( 0.1, 0.1, 0.1, 0.5 ) myText.anchorX = 0 myText.x = 140 myText.y = 325 local myText = display.newText( "N", 0, 0, native.systemFontBold, 60 ) myText:setFillColor( 0.1, 0.1, 0.1, 0.5 ) myText.anchorX = 0 myText.x = 140 myText.y = 385 local myText = display.newText( "N", 0, 0, native.systemFontBold, 60 ) myText:setFillColor( 0.1, 0.1, 0.1, 0.5 ) myText.anchorX = 0 myText.x = 140 myText.y = 445 local myText = display.newText( "G", 0, 0, native.systemFontBold, 60 ) myText:setFillColor( 0.1, 0.1, 0.1, 0.5 ) myText.anchorX = 0 myText.x = 195 myText.y = 205 local myText = display.newText( "G", 0, 0, native.systemFontBold, 60 ) myText:setFillColor( 0.1, 0.1, 0.1, 0.5 ) myText.anchorX = 0 myText.x = 195 myText.y = 265 local myText = display.newText( "G", 0, 0, native.systemFontBold, 60 ) myText:setFillColor( 0.1, 0.1, 0.1, 0.5 ) myText.anchorX = 0 myText.x = 195 myText.y = 325 local myText = display.newText( "G", 0, 0, native.systemFontBold, 60 ) myText:setFillColor( 0.1, 0.1, 0.1, 0.5 ) myText.anchorX = 0 myText.x = 195 myText.y = 385 local myText = display.newText( "G", 0, 0, native.systemFontBold, 60 ) myText:setFillColor( 0.1, 0.1, 0.1, 0.5 ) myText.anchorX = 0 myText.x = 195 myText.y = 445 local myText = display.newText( "O", 0, 0, native.systemFontBold, 60 ) myText:setFillColor( 0.1, 0.1, 0.1, 0.5 ) myText.anchorX = 0 myText.x = 255 myText.y = 205 local myText = display.newText( "O", 0, 0, native.systemFontBold, 60 ) myText:setFillColor( 0.1, 0.1, 0.1, 0.5 ) myText.anchorX = 0 myText.x = 255 myText.y = 265 local myText = display.newText( "O", 0, 0, native.systemFontBold, 60 ) myText:setFillColor( 0.1, 0.1, 0.1, 0.5 ) myText.anchorX = 0 myText.x = 255 myText.y = 325 local myText = display.newText( "O", 0, 0, native.systemFontBold, 60 ) myText:setFillColor( 0.1, 0.1, 0.1, 0.5 ) myText.anchorX = 0 myText.x = 255 myText.y = 385 local myText = display.newText( "O", 0, 0, native.systemFontBold, 60 ) myText:setFillColor( 0.1, 0.1, 0.1, 0.5 ) myText.anchorX = 0 myText.x = 255 myText.y = 445 for i = 1, 25 do spots[i] = display.newRect( 0, 0, 55, 55) spots[i]:setFillColor( 0.2,0.2,0.2,0.3 ) spots[i].x = ( i - 1 ) % 5 \* 60 + 40 spots[i].y = math.floor( ( i - 1 ) / 5 ) \* 60 + 205 spots[i].moveText = display.newText( " ", spots[i].x, spots[i].y, native.systemFontBold, 60) spots[i].moveType = nil spots[i]:addEventListener( "touch", handleMove ) end local myPlayer1 = display.newImageRect("free.png", 55, 55) myPlayer1.x = 160 myPlayer1.y = 325 for i = 1, 25 do spots[i] = display.newRect( 0, 0, 55, 55) spots[i]:setFillColor( 0.2,0.2,0.2,0.1 ) spots[i].x = ( i - 1 ) % 5 \* 60 + 40 spots[i].y = math.floor( ( i - 1 ) / 5 ) \* 60 + 205 spots[i].moveText = display.newText( " ", spots[i].x, spots[i].y, native.systemFontBold, 60) spots[i].moveType = nil spots[i]:addEventListener( "touch", handleMove ) end local B = { 1, 2, 3, 4, 5, 6, 7, 8, 9, 10, 11, 12, 13, 14, 15 } local I = { 16, 17, 18, 19, 20, 21, 22, 23, 24, 25, 26, 27, 28, 29, 30 } local N = { 31, 32, 33, 34, 35, 36, 37, 38, 39, 40, 41, 42, 43, 44, 45 } local G = { 46, 47, 48, 49, 50, 51, 52, 53, 54, 55, 56, 57, 58 ,59, 60 } local O = { 61, 62, 63, 64, 65, 66, 67, 68, 69, 70, 71, 72, 73, 74, 75 } math.randomseed( os.time() ) -- Seed the pseudo-random number generator local function shuffleTable( t ) if ( type(t) ~= "table" ) then print( "WARNING: shuffleTable() function expects a table" ) return false end local j for i = #t, 2, -1 do j = math.random( i ) t[i], t[j] = t[j], t[i] end return t end shuffleTable( B ) shuffleTable( I ) shuffleTable( N ) shuffleTable( G ) shuffleTable( O ) local B\_spots = {} local I\_spots = {} local N\_spots = {} local G\_spots = {} local O\_spots = {} for i = 1, 5 do B\_spots[i] = display.newText( B[i], 45, i \* 105, native.systemFontBold, 28 ) B\_spots[i] : setFillColor(1, 1, 1 ) I\_spots[i] = display.newText( I[i], 100, i \* 105, native.systemFontBold, 28 ) B\_spots[i] : setFillColor(1, 1, 1 ) N\_spots[i] = display.newText( N[i], 160, i \* 105, native.systemFontBold, 28 ) B\_spots[i] : setFillColor(1, 1, 1 ) G\_spots[i] = display.newText( G[i], 220, i \* 105, native.systemFontBold, 28 ) B\_spots[i] : setFillColor(1, 1, 1 ) O\_spots[i] = display.newText( O[i], 280, i \* 105, native.systemFontBold, 28 ) B\_spots[i] : setFillColor(1, 1, 1 ) B\_spots[i].y = math.floor( ( i - 1 ) / 1 ) \* 60 + 205 I\_spots[i].y = math.floor( ( i - 1 ) / 1 ) \* 60 + 205 N\_spots[i].y = math.floor( ( i - 1 ) / 1 ) \* 60 + 205 G\_spots[i].y = math.floor( ( i - 1 ) / 1 ) \* 60 + 205 O\_spots[i].y = math.floor( ( i - 1 ) / 1 ) \* 60 + 205 B\_spots[i].moveType = nil I\_spots[i].moveType = nil N\_spots[i].moveType = nil G\_spots[i].moveType = nil O\_spots[i].moveType = nil spots[i]:addEventListener( "touch", handleMove ) end N\_spots[3].text = " " 

I have this set as a bingo game.  When I save and test to Android it has a white box around the “reset”  button.  Also the reset button only appears after someone has gotten all 5 squares across.  I want the reset text and button to appear always.  I have gotten this to work by adding this.

 resetButton2 = widget.newButton({ label = "Reset", x = display.contentCenterX +120, y = display.contentHeight -320, font = native.systemFontBold, fontSize = 20, labelColor = { default = { 1,1,1}, over = { 1, 0, 0 } }, onPress = resetGame }) end

at the end of the code and reducing the opacity of the first reset button to 0.01.  

I want the reset button to not have any square around it.  I have already tried to set the “textOnly” to true.  Anywhere I have put this command gives me an error code.  I have also tried to set the reset button to shuffle the numbers as well but have only gotten errors.  

I have done all I know to fix this and have looked for tutorials but nothing is clear.  The three things I am trying to accomplish is to have the reset option appear and work at any time, the reset to shuffle the numbers as well and when testing in an Android device NOT having the white background rectangle on the reset text. 

If you would please help. 

@everyone,

If anyone wants to jump in and help, don’t let my response stop you. It may very well be someone can help mark here by just reading the code above.

I’m just partial to running code to debug it.

Mark,
 
I pasted that into a file and it doesn’t run.
 
Please.  I’d like to help but I simply don’t have time to deal with that much code.
 
I will help if you:
 
A. Make a tiny example that demonstrates the problem with just one button.  Zip up that test project and attach it here.
 
B. Answer my original questions in a clear, concise, and precise numbered list response:
 

  1. What you did.
     
  2. What you expected to see.
     
  3. What you saw.
     
  4. Why you think it is wrong. 


    Alternately, zip up your project and attach it so we can run it.  I’m simply not keen on having to write my own project to help you debug your game. 

I found the reason your pasted code didn’t run. Of course, I have not got your images.

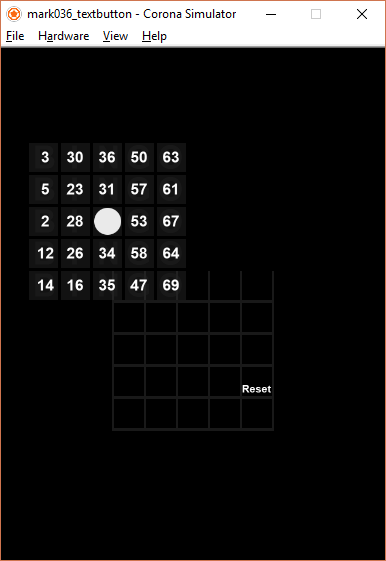
I used a placeholder image and have this so far:

https://github.com/roaminggamer/RG_FreeStuff/raw/master/AskEd/2018/10/mark036_textbutton.zip

I’ll re-read your post and ping back later. For now, folks can download the zip I provide to help.

mark036_textbutton.png


Updated by adding ‘reset’ button code too, just a moment ago. - 1043 PST

I spent some time on this, but I’ve run out of time for now. - 1131

PS - How did this question evolve from “box around text button when testing in Android” which sounds like about 10 lines of code, to “Here is my entire game.  Help me debug it?”

Just making a guess. I search for “alpha” using ctrl+f, but there doesn’t seem to be a mention of it anywhere in the code.

You seem to just be using setFillColor, e.g. “setFillColor( 0.2,0.2,0.2,0.1 )” to make things close to transparent. If your buttons or objects have a stroke applied to them, then controlling alpha within setFillColor only affects the fill itself, but it leaves the stroke as is. In order to control the alpha of the entire object, use “object.alpha = 0”.

Oh, and also, you have several things in your code that you want to address.

For instance, you create the variable “local myText” numerous times. Each time you create a new local myText, the old variable is lost somewhere beyond time and space, i.e. you can’t control it anymore. If you create 20x local myText variables and try to delete them, you can only do so for the last myText that was created as the references to the old myText variables are lost.

I would recommend creating a table, i.e. “local myText = {}”. Then you could create the text objects in a loop by using myText[#myText+1] instead of creating a new local every time. This’ll save you time and remove unnecessary code. This would also allow you to actually control (or remove) the display objects.


http://www.boise.isonmy.tv/bingoexample.zip

I wasn’t able to find a way to upload a zip file. So I included it in the link.  I saw the  “object.alpha = 0” comment above.  Where does this go into the code?  Anywhere I put it I come up with an error.  Is there some other code that needs to go with it.  I have put it in the code 

resetButton = widget.newButton({ label = "Reset", x = display.contentCenterX +120, y = display.contentHeight -320, font = native.systemFontBold, fontSize = 20, labelColor = { default = { 1,1,1}, over = { 1, 0, 0 } }, onPress = resetGame })

ie:

resetButton = widget.newButton({ label = "Reset", x = display.contentCenterX +120, y = display.contentHeight -320, font = native.systemFontBold, fontSize = 20, labelColor = { default = { 1,1,1}, over = { 1, 0, 0 } }, object.alpha = 0 onPress = resetGame })

and

resetButton = widget.newButton({ label = "Reset", x = display.contentCenterX +120, y = display.contentHeight -320, font = native.systemFontBold, fontSize = 20, labelColor = { default = { 1,1,1}, over = { 1, 0, 0 }, object.alpha = {0}}, onPress = resetGame })

But none of it works.  I have tried many other spots in the code but I can’t get it to work. 

Mark,

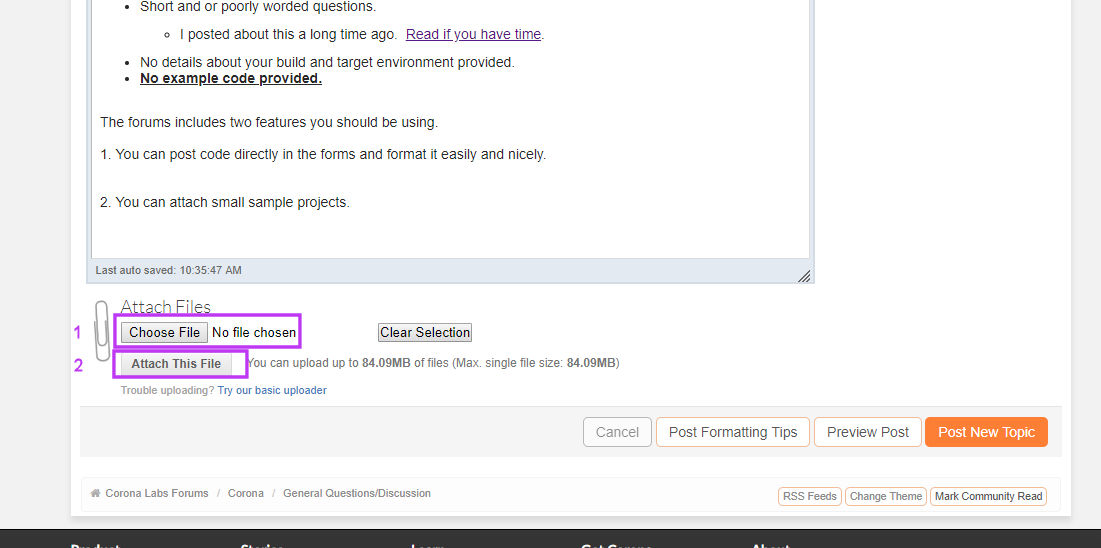
To attach a zip file to a post do the following.

  1. Create the project and zip it up.

  2. Click ‘More Reply Options’ on the right-bottom side of the post window.

  3. Follow thees directions.

attaching_files.jpg

  1. Submit the post or update.

Enclosed is the zip file. 

You want to change the alpha of the reset button or other objects?

  1. If you want to change the alpha of the reset button:

    resetButton = widget.newButton( { … } ) resetButton.alpha = 0 – change alpha after creating button

  2. Similarly, if you want to change the alpha of other game objects, you need a reference to the objects.

Download this file (just updated):

 https://github.com/roaminggamer/RG_FreeStuff/raw/master/AskEd/2018/10/mark036_textbutton.zip

See sub-folder: 02_alpha for an example.

PS - Please note that I attach links to files on my git.  I do not use the Corona supplied mechanism.

I do this because there is a limit on attachments.  Also, I like folks to be able to get all my code if they want it by downloading the entire repository.

If you have a gitHub account you too can do this.  That said, Corona provides an easy way to attach files for folks who don’t have the setup I do.

I don’t know how to ask this any other way.  The problem.  When I test in Android it puts a white triangle over my word reset.  I have looked online and it says that this is common and there is a way to fix it.  I can’t find how.  I have downloaded the zip files and still can’t find how to remove this rectangle when I test on android.  I uploaded the apk for the download file you supplied to test.  It still has the same white rectangle.  I have put the code you supplied in your above comments and it removes the text as well.  What I want is to remove the white rectangle button over the text of “Reset” without removing the text of functionality of the button.  In other words I want the word “Reset” to appear.  When you click on it I want to reset the game.  I do not want an additional rectangle around the button.   

Mark,
 
I think the confusion here is.
 

  1. Your title implied the question was about a rectangle around your button.
     
  2. You then pasted your entire game which many of us (here on our free time) didn’t have time to read.
     
    In your shoes, what I would do is:
     
  3. Make a tiny demo of just a button to reproduce the problem.
     
  4. Having reproduced the problem, I’d share the tiny demo and ask for help.  In my post I’d give the run down of details:
     
    A. Corona version I built with.
     
    B. Target device and OS version I ran on.
     
    C. The mini-list:
  • What I did.
  • What I saw.
  • What I expected to see.
  • Why I think that is wrong.
     
    I know this seems like a lot of work, but in my experience this ends up helping me find the source of the problem before I ever need to press the ‘post’ button.
     
     
    A Little More Help
     
    So, in that spirit, I have done the following:
     
  1. I built 02_alpha into an APK on my Windows 10 system, running Corona 2018.3363
     

  2. I installed it on my Samsung (SM-T230NU) running Android 4.4.2.
     

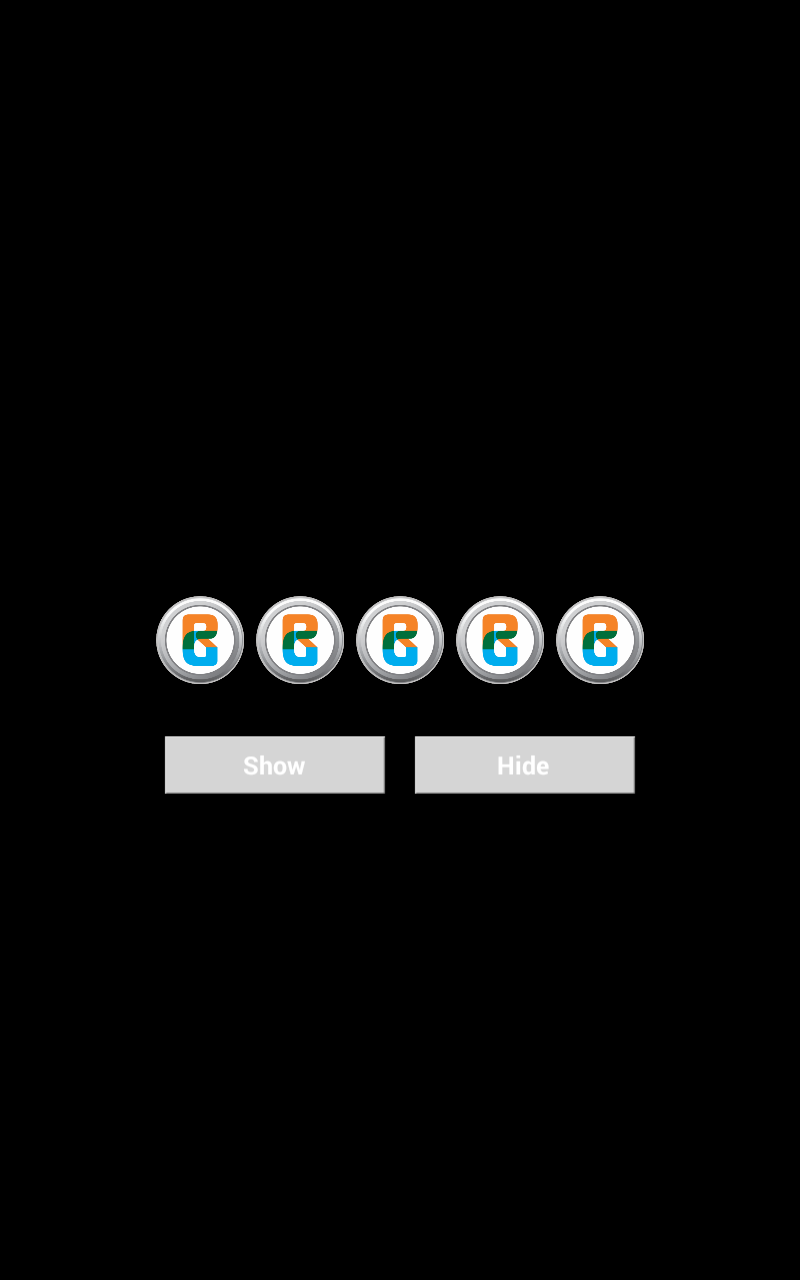
  3. I ran it and I see this:
    whatIsee.png
     
    The code is derived from what you pasted above in one of your original posts.  

    widget.newButton( { label = “Hide”, x = cx + 100, y = cy + 100, font = native.systemFontBold, fontSize = 20, labelColor = { default = { 1,1,1}, over = { 1, 0, 0 } }, onPress = hide } )

  
I am pretty sure this is not what you want. 

Did You Want A Shape Button?
Now that I’m focused just on the button code I can tell you you didn’t fully define that button. 

You’ ae going to get whatever button is the default for the OS you’re on with a few mods.  The button will use images, not a filled rectangle.  So, it will look different for different devices and OSes.
 
I think what you really want is a shape button: 
https://docs.coronalabs.com/api/library/widget/newButton.html#shape-construction
 

Something like this code will produce a consistent button across all platforms (with the exception of the font):

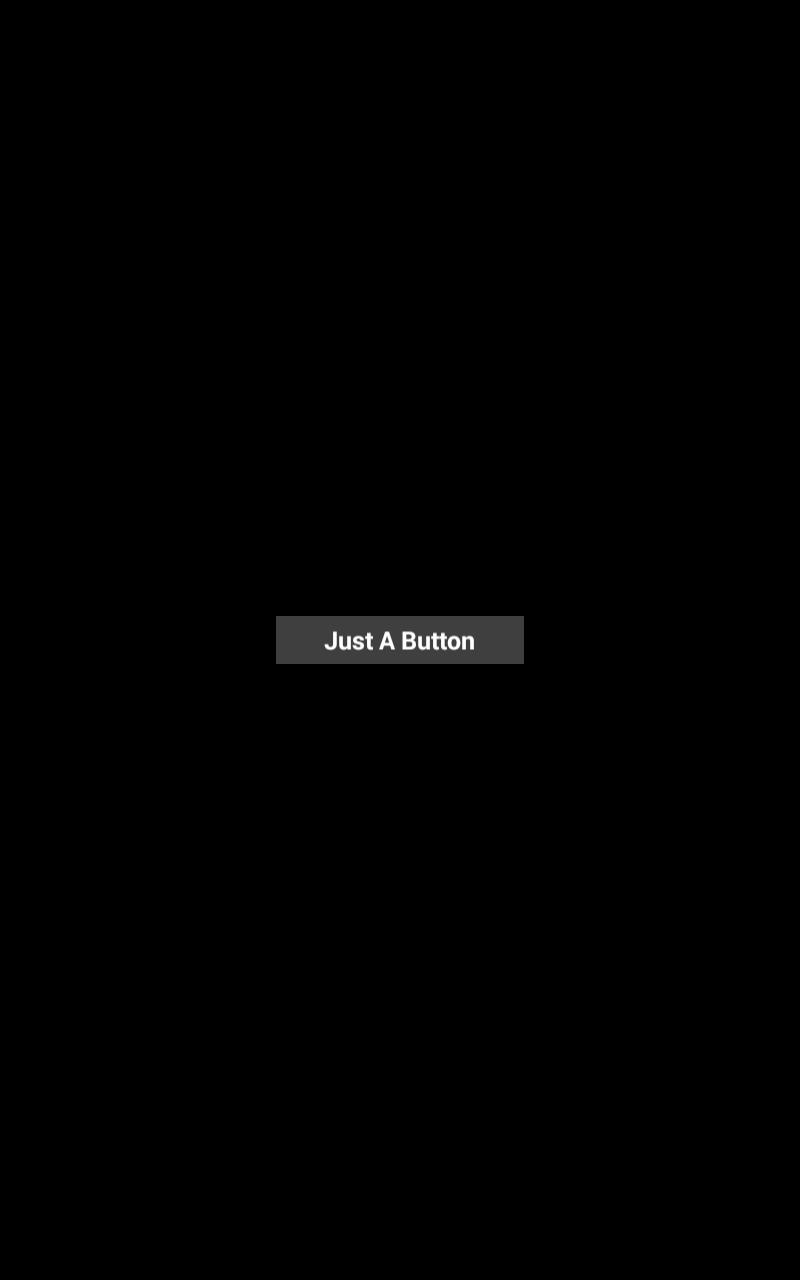
widget.newButton( { label = "Just A Button", x = cx, y = cy, font = native.systemFontBold, fontSize = 20, shape = "rect", width = 200, height = 40, fillColor = { default = { 0.25, 0.25, 0.25, 1 }, over = { 0.5, 0.5, 0.5, 1 } }, labelColor = { default = { 1,1,1}, over = { 1, 0, 0 } }, strokeColor = { default = { 0, 0, 0, 1 }, over = { 1, 0, 0, 1 } }, strokeWidth = 2 } )

 
This produces the following image:
better.png
 
 
You can get the code for all these examples and the APK for both tests by downloading this: 
https://github.com/roaminggamer/RG_FreeStuff/raw/master/AskEd/2018/10/mark036_textbutton.zip
 
You can get the APKs directly here:

Please download and run the APKs. Then take a look at the code.

I think this is what you need to see and know to get this rolling.

If you still get weird results, use my 03_better example as a base and show us exactly what you are doing that doesn’t work for the button by itself.

PS - Please always read your post after you submit it, then if it is illegible re-edit it and fix it.

I’m not a fan of super-smooshed uni-posts. A little formatting, line breaks, paragraphs, … goes a long ways towards helping us to help you.

Thank you for your help.  Your example that says “Just a Button.”  I would like it to act as a hyperlink so on the screen it would just say “Just a Button” with no rectangle around it.  In your example it has a grey button rectangle around it.  I want to keep the functionality of it without the grey button.   If this is too difficult is there a way to remove the text and grey and replace it with a png that I can control the size and position?

I second Ed’s point. The very least that you could, and should, do is to at least provide us with a screenshot of the problem and then tell us: what can we see in the image and what should we see.

If you want the button to be completely transparent, I’d make a 2-image button (https://docs.coronalabs.com/api/library/widget/newButton.html#image-construction) where both images are a transparent texture.

Experiment w/ my base sample and the code in the newButton docs.  They give plenty of examples:

https://docs.coronalabs.com/api/library/widget/newButton.html#image

You can find a transparent fill texture here:

https://github.com/roaminggamer/RG_FreeStuff/raw/master/AskEd/2018/10/dodiPhysics/fillT.png

I should note that using SSK this button (as I understand it) would essentially be:

local function action( event ) -- ... do something here end ssk.easyIFC:presetPush( nil, "default\_edgeless", centerX, centerY, 200, 40, "Just A Button", action, { labelSize = 20 } )

https://roaminggamer.github.io/RGDocs/pages/SSK2/

https://github.com/roaminggamer/SSK2

https://roaminggamer.github.io/RGDocs/pages/SSK2/libraries/easy_interfaces/#easy-interfaces-sskeasyifc

_ I’m not actually suggesting you use SSK.  This note is for future readers. _

widget.* is fine and fully capable of doing what you need.

I’m not clear what you want here.  Do you want a rectangle or do you not want a rectangle.
 
A good way to write posts when you’ve encountered a problem is to use this format:
 

  1. What you did.

  2. What you expected to see.

  3. What you saw.

  4. Why you think it is wrong.