How to select an element in CSV, Lua table, JSON and SQLite?

Hello! I am new here so let me describe my situation in detail. At the moment, I am only familiar with AppInventor, which allows you to create applications without knowledge of programming languages. Of course, it’s cool. But I want to move forward. After reading various reviews, I became interested in Solar2D. This is very interesting, but difficult for me, so I decided to repeat the AppInventor project here to get hands-on experience with the Lua language and Solar2D capabilities.

After reading the tutorial, I know how to implement some features. But there are some things that still give me trouble. This is partly due to the fact that I think in AppInventor categories so far. So I want to describe what I want to do and ask for your advice on how best to do it.

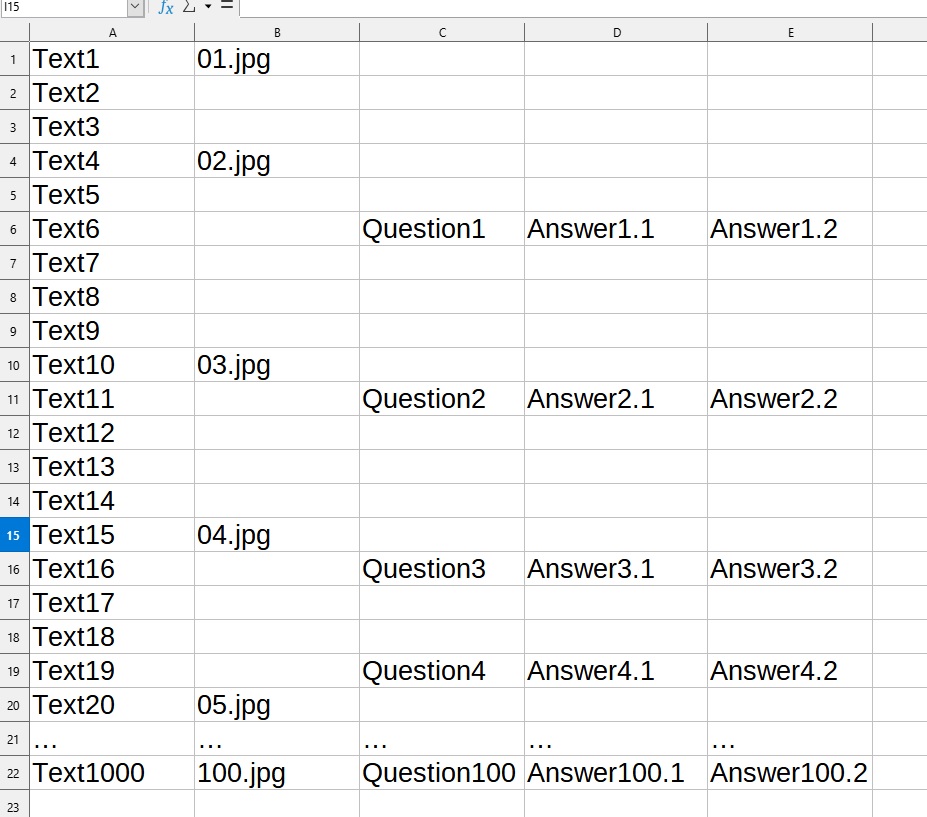
I have a csv file which content looks like this:

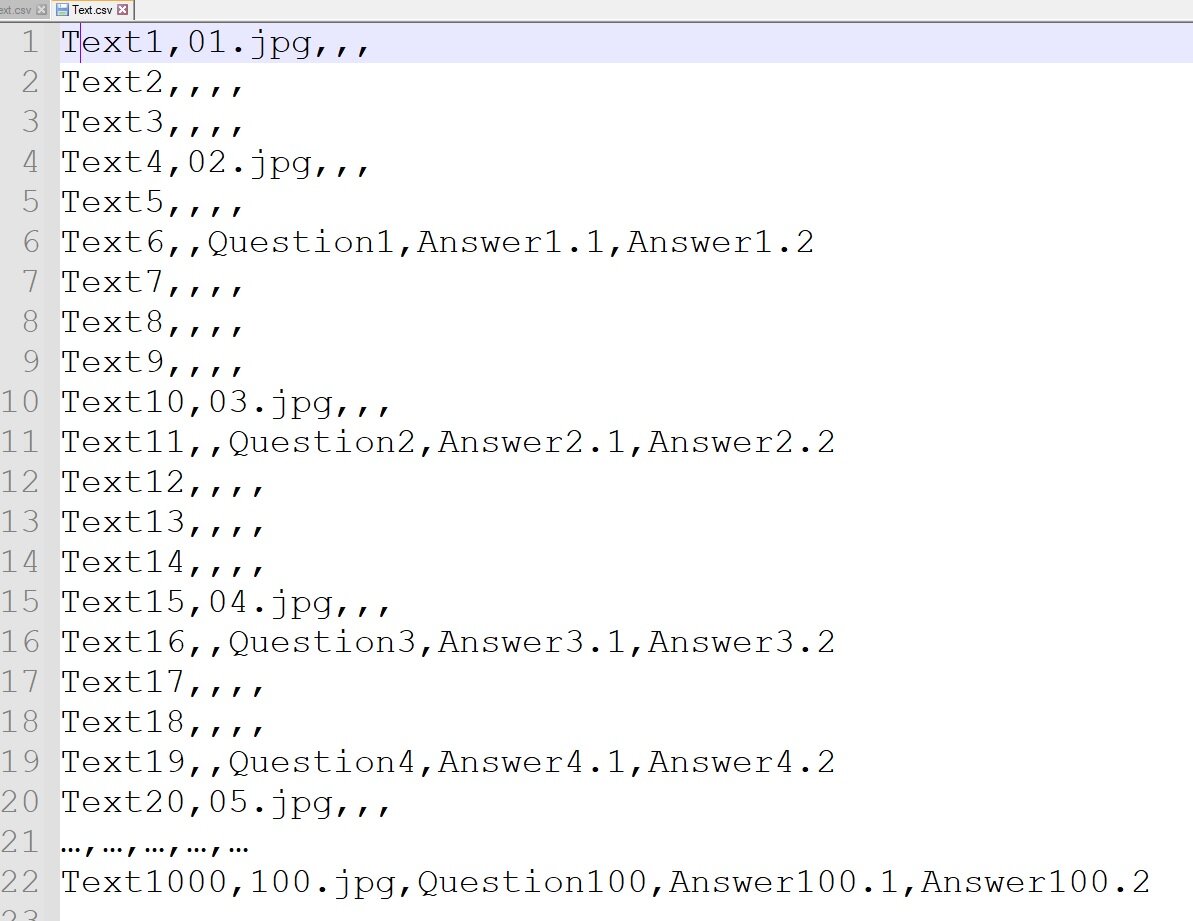
If you open this file in a text editor, it looks like this:

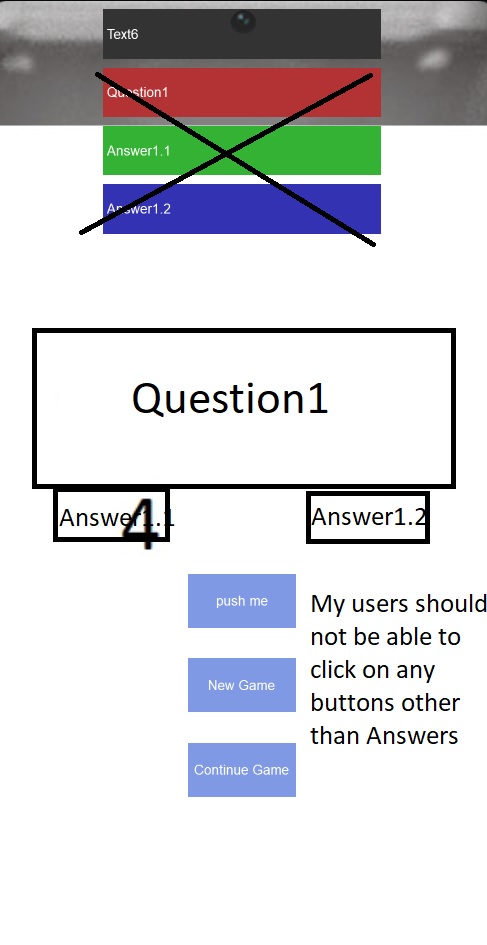
In my original application, users see Text1. Then they tap on a certain button and see Text2 instead of Text1, then Text3 and so on. Each text consists of several sentences using the Latin alphabet and punctuation marks (: . ,). I am clarifying this because in my search for an answer to my question, I found a thread where the presence of a comma was given importance.

If the column with pictures is not empty, then users see the picture that is indicated there (for example, 01.jpg).

If the question column is not empty, then users see a pop-up message with the question listed there.

Users can then make a selection (next two columns).

In short, this csv file is the main content of my application. It is read-only. The user cannot change its data.

So my question is this. How to implement this in Solar2D? I don’t know of a way to “friend” Solar2D and my csv file. Obviously, using a Lua table is a bad idea, since a real csv file consists of several thousand lines. But then what? JSON or SQLite? I think about SQLite, but there are questions here as well.

1.What free program will help me create and edit .db? Or does Solar2D “understand” other databases besides .db? I found an online service to convert csv to SQLite database. But for some reason it refused to work due to the fact that in all columns except the first there are empty cells. Or can Solar2D itself “translate” the data from the csv file to .db?

  1. In accordance with the tutorials on the Solar2D website, I created and loaded the database (not with the data from my csv file, but with the data from the example). But how do I select the first cell in the first column, where all actions in my experimental application begin?

  2. How to correctly formulate a condition so that the application performs one or another action when the cells of other columns are not empty?

Thanks in advance for your reply.

First, be aware that Solar2D is an SDK so you can make up any solution you like using the ‘tools’ the SDK provides. i.e. There is no single correct way to do this.

Second, make use of free content provided by others when possible.

Having said that, I made a basic example using mostly standard Solar2D code with some additional ‘extensions’ of my own to make life easier.

https://github.com/roaminggamer/RG_FreeStuff/raw/master/AskEd/2022/06/csvQuestion.zip

io.output():setvbuf("no")
display.setStatusBar(display.HiddenStatusBar)
-- =====================================================
-- Require these just once in main.lua
require "extensions.string"
require "extensions.io"
require "extensions.table"
require "extensions.math"
require "extensions.display"
-- =====================================================
local cx     = display.contentCenterX
local cy     = display.contentCenterY
local fullw  = display.actualContentWidth
local fullh  = display.actualContentHeight
local left   = cx - fullw/2
local right  = cx + fullw/2
local top    = cy - fullh/2
local bottom = cy + fullh/2
-- =====================================================

-- Load CSV file as table of tables, where each sub-table is a row
local lines = io.readFileTable( "dummy.csv", system.ResourceDirectory )

local rows = {}

for i=1, #lines do	
	rows[#rows+1] = string.fromCSV(lines[i])
end

-- Debug step to see what we extracted from the CSV file
table.print_r(rows)


-- Make some labels, image, and rectangle to use as a button
local label1 = display.newText( "Press Button To Start", left + 10, top + 20,  native.systemFont, 16 )
label1.anchorX = 0 -- x-position is left side of label instead of defult horizontal centering (anchorX=0.5)

local label2 = display.newText( "----------", left + 10, top + 40,  native.systemFont, 16 )
label2.anchorX = 0 -- x-position is left side of label instead of defult horizontal centering (anchorX=0.5)

local label3 = display.newText( "----------", left + 10, top + 60,  native.systemFont, 16 )
label3.anchorX = 0 -- x-position is left side of label instead of defult horizontal centering (anchorX=0.5)

local label4 = display.newText( "----------", left + 10, top + 80,  native.systemFont, 16 )
label4.anchorX = 0 -- x-position is left side of label instead of defult horizontal centering (anchorX=0.5)

local img = display.newImageRect( "images/fillW.png", 64, 64 )
img.anchorX = 0
img.anchorY = 0
img.x = left + 10
img.y = top + 100


local button = display.newImageRect( "images/fillW.png", 128, 64 )
button.x = cx
button.y = cy
button:setFillColor( 0.5, 0.6, 0.9 )
button.label = display.newText( "push me", button.x, button.y,  native.systemFont, 16 )

local curRow = 0


local function onTouch( event )
	if( event.phase == "ended" ) then
		curRow = curRow + 1

		if( curRow <= #rows ) then
			table.print_r(rows[curRow])
			print(rows[curRow][1])
			label1.text = tostring(rows[curRow][1])
			label2.text = tostring(rows[curRow][3])
			label3.text = tostring(rows[curRow][4])
			label4.text = tostring(rows[curRow][5])
			img.fill = { type = "image", filename = tostring(rows[curRow][2]) }
		else
			label1.text = "Out of data"
			label2.text = "----------"
			label3.text = "----------"
			label4.text = "----------"
			img.fill = { type = "image", filename = "images/fillW.png" }
		end

	end
	return True
end

button:addEventListener( "touch", onTouch )

Note: This is the CSV file I used in the example:

Text1,images/01.png,,,
Text2,,,,
Text3,,,,
Text4,images/02.png,,,
Text5,,,,
Text6,,Question1,Answer1.1,Answer1.2
Text7,,,,
Text5,,,,
Text8,,,,
Text9,images/03.png,,,
Text10,,,,
Text11,,Question2,Answer2.1,Answer2.2

Warning: Do not use commas in the text of your CSV files because that will mess up the column detection.

Thanks a lot! First, I replaced your test file with the one I used in the real project. Everything works exactly as I described. This is amazing! I am planning to take a closer look at your code in order to “feel” the whole process.

I am already making changes to better understand Solar2D. I like how my application is transformed (or corrupted, haha) after each of my actions. However, I have a question regarding how to “fit” text into an image and vice versa. Perhaps I should illustrate this.

I added an image as a background for the text:

local sheet = display.newImageRect( "images/sheet.jpg", 4080, 90 )
sheet.anchorX = 0
sheet.anchorY = 0
sheet.x = left + 10
sheet.y = top

The value of “4080” I used only to stretch the image across the width of the entire device. I don’t know if this is correct.

  1. How can I “explain” to the program that the text should automatically wrap to the next line when it reaches the right edge of the smartphone?

  2. How can I adjust the height of the picture? Now it’s 90. But that’s wrong. I want the height of the image to change depending on how much text is “inside” it. For example, if it is one line of text, then it should be a thin strip. And if this is a whole paragraph of text, then it should all be on a yellow background, and not go beyond it.

If I understand correctly, then I should make changes to the following code and set the dependence of the height of the image on the length of the text:

local label1 = display.newText( "Press Button To Start", left + 20, top + 20, native.systemFont, 16 )
label1:setFillColor( 0, 0, 0 ) -- my change to black
label1.anchorX = 0 -- x-position is left side of label instead of default horizontal centering (anchorX=0.5)

How to do this, given that the image is loaded before the text? I mean, it is in the code above. Otherwise, the text appears under the picture. That is, it will not be visible to users.

1 Like

I didn’t mention this last time, but some go to docs are:

To answer some of your questions,

Understanding The Screen Size
There are a number of screen size and object size related parameters: Solar2D Documentation — API Reference | Libraries | display. Pay particular attention to:

display.actualContentHeight, display.actualContentWidth, display.contentCenterX, display.contentCenterY, display.contentHeight, display.contentScaleX, display.contentScaleY, display.contentWidth, display.pixelHeight, display.pixelWidth, display.safeActualContentWidth, display.safeActualContentHeight, display.safeScreenOriginX, display.safeScreenOriginY, display.screenOriginX, display.screenOriginY, display.statusBarHeight, display.topStatusBarContentHeight, display.viewableContentHeight, display.viewableContentWidth

If this seems like a lot…well it is. Much of this comes from the fact that mobile devices come in a zillion resolutions, some with notches, some without, some with bottom bars, some with out, some with round corners, some with square… then you add PCs, Arcade consoles, … and you have a whole mess of stuff to account for.

… having said that, I have my own shorthand variables that I use: https://raw.githubusercontent.com/roaminggamer/SSK2/master/ssk2/core/variables.lua

Fitting Stuff On the Screen
You didn’t ask this, but it is bound to come up. i.e. The question "How do I get my game/app to display similarly on different devices.

This is a whole discussion that starts here:

I have a bunch of examples that I’ll share in a post below, but honest I suggest you wait on answering these kinds of questions till you get more familiar with Solar2D. For now I’d just experiment and make your experiments work with one simulated device to start.

Making Text Objects Wrap
In the example I shared, I used the legacy form of newText(). You want to use the ‘newer’ form and specify a width so it can wrap.

Adjusting Height Of 'Picture’
sheet.height = label1.height

1 Like

As promised… some resources of my own that you may find useful some time in the future:

1 Like

Oh, thanks a lot. I think that I will need a couple of weeks to study all this and try to do something of my own then. To be honest, I visited some of these links last week. But there was so much information that I was scared, so I decided to take the shortest way, haha.

So when I have specific instances of my code and new questions, I will post them (here or in another thread) to make you sure that I am learning all of those resources.

So far, I can’t figure out how to correctly determine the height of label1, which is dynamic and depends on the length of the text. At the moment it looks like this:

local label1 = display.newText( "Press Button To Start", left + 30, top + 250, 786, 300, native.systemFont, 16 )

The value 300 is fixed, which is wrong. I used it just as an example. And as you wrote, the background height of the text is equal to the height of label1.

sheet.height = label1.height

But how to calculate the height of label1 depending on the text that is taken from the cell of the csv file?

Compare main.lua in this example:

https://github.com/roaminggamer/RG_FreeStuff/raw/master/AskEd/2022/06/csvQuestion_v2.zip

to the old main.lua in the prior example.

Pay particular attention to resize_reposition()

Yes, that’s exactly what I was asking about. Thank you. I will carefully study this code.

Glad to help. Hope you enjoy the process and make headway towards your goals.

Note: I’m not able to review forums/discord every day, so if I don’t answer an ongoing thread for a day or two just be aware that is the reason.

Oh, this is a very cool and unforgettable experience. I especially enjoy watching how each new line of code changes my application. This happens very quickly. And sometimes the changes are dramatic and even fatal, haha.

I appreciate your help and I am glad that you take the time to answer primitive newbie questions. By the way, this is one of the reasons why I have been studying your links. I don’t want my questions to seem too simple. However, there is a lot of useful information, so I am probably missing something.

In particular, I have the following questions:

  1. How can I make sure that my application does not request access to user files at startup? My text application is quite simple. Almost all of its content is in a csv file. That is, for the normal functioning of the application, it is enough to receive data and read information from the cells of this table. The application does not create new files or modify the csv file.

Why is this important to me? The fact is that I encountered this problem when I was making the first applications in App Inventor. If my app was launched and prompted to access files, there were always users who denied it. As a result, that application could not receive data from the csv file, the user saw a black screen and wrote about a non-working application.

Then I solved this issue using another plugin for working with files. But since App Inventor is visual programming, I don’t know how exactly the author of that plugin fixed this problem. But the fact is that when I run that application, my users don’t see this prompt. Accordingly, they do not have the opportunity to violate the logic of its work.

  1. I need my application to store data (the current row in the csv table and the current image used as a background) in the application’s internal directory. Something like auto-save in the game. The next time the user enters the application, he/she will click on “Continue game” and will be taken to the line of text from the csv file that he/she read last time.

What is the easiest way to do this? With JSON? Or is there an even simpler solution? This is a set of two values. For example, 22, “files\05.jpg”, where 22 is the line number from the csv file, and “files\05.jpg” is the file that will be used as background when the game continues.

The (Sandboxed) Areas
Your game/app will have access to these areas (user does not need to OK this and cannot remove your access to these areas; i.e. you always have permission to access these):

  • system.ResourceDirectory - This is the where your scripts, image assets, and CSV (at least in the example I provided) live.
  • system.ApplicationSupportDirectory - I rarely use this. Read page to learn more.
  • system.CachesDirectory - I rarely use this. Read page to learn more.
  • system.DocumentsDirectory - This is typically where you will write and retrieve persistent game data like player progress, setting selections, etc.
  • system.TemporaryDirectory - You typically use this space for non-persistent storage. When your app stops running, this space may get automatically cleaned up by the OS. I don’t usually rely on this and use DocumentsDirectory and delete files myself, but to each his or her own.

Areas Outside The Sandbox (Controlled by OS and user permissions)
You can get access to file areas outside of the (above) sandboxed areas, but typically you would use a plugin for this and then the user would need to give your app extra permissions.

Saving and Restoring Data - Easiest To Use/Learn and Most Flexible
The best (in my opinion) way to save data and restore it later is using JSON encoded tables. See my discussion here: Read and write the same file

Warning: I am not talking about the best way to provide (initial data) for your app/game in this answer. You have already expressed an interest in using CSV files and a CSV file is a perfect way to store large amounts of quiz game data (and other tabular data) for inclusion with your app/game. It is also a perfect way to store data you’ll have the user download later (if you should ever go there).

Instead, my answer here is about data created while running your app/game that you want to save and have restored when running later. JSON encoded tables are great for that.

Note: The ‘extensions’ in my first and second examples (provided to you in this thread) make saving and restoring tables easy once you understand the fundamentals of Lua tables.

Having said that, if you get stuck, post back and try to give me a terse bullet list description of your data save and restore scenario and I’ll try to help.

Cheers,

Ed (aka RoamingGamer)

  1. I decided to take it step by step. To be honest, I haven’t gotten around to storing values in a table, CSV, or JSON yet. Instead, I decided to store the values in variables. Yes, I know that it’s wrong because these values will be deleted immediately after the application is closed. But I just wanted to practice on the simplest. And it helped me understand that I don’t understand something, haha. So, specific question.

I understand how to store the value of the current row. How to save the filename? I changed your code a bit and tried to store this value on line 145. But I did it wrong. Each time, I don’t save the file name, but the value in the second column, which is often empty. Accordingly, I see a blank screen instead of a picture.

And since this is a very stupid question, I’d like to ask another one, haha.

  1. I want the question and answer options to “pop up” in the middle of the screen and make the rest of the screen elements inactive and gray (as if in a fog, figuratively speaking). Well, that is, so that my user cannot tap other buttons until he/she selects one or another answer option.

Can this all be done as a text, a background for it and a button? Or is there a special tool for popup events, notifications and so on?

I am attaching the archive with the modified project. There is nothing to be proud of yet. I just added some buttons and variables. Naturally, the graphic design, the layout of the buttons and everything else is just a temporary option.

csvQuestion_v2-send.zip (141.1 KB)

Sorry, I’ve read the above a few times and don’t know what you need.

Please summarize the above post as a short bullet list of things you want to do.

Oh, sure. I will try to explain what I want as briefly as possible.

  1. In the modified file, I created a Continue Game button so that my users can continue where they left off last time. But I don’t know how I can save the image that my user sees as a background into a variable. Instead, I store rows[curRow][2]), which is wrong.

  2. I want the questions and answers to appear in the following pop-up window, which will not allow my users to click on other buttons:

2.1 Is it enough for me to move already created questions and answers to the center of the screen? Or is there another way for popup messages?

2.2 How can I prevent my users from clicking other buttons? Only two buttons should be active. Answer 1.1 and Answer 1.2.

General Comments Regarding GUI Design and Behavior

  • You can design the GUI any way you want, but it will involve understanding: display groups, display objects, touch behaviors, GUI concepts, and having a general plan for how the interaction should work.
  • As you are new this is a little bit advanced, but still doable.
  • I can’t easily describe the design of a dialog here, but…
  • If you simply want a button to be ‘not clickable’, maintain a state variable that enables/disables clicking and in the script that handles clicks for that button check the variable. If it is set to false, ignore the click.

Regarding ‘Continue’ Game

  • The best approach is save the state of the game (not the game data itself)
  • As the player advances through the game, keep track of the index into your data table that is being displayed.
  • When save the ‘current state’ of the game, save: puzzle name, index into that puzzle.
  • When you restore the ‘current state’ of the game, load from the saved puzzle and start displaying it at the saved index. i.e. not at 0.
  • You will have game data stored in your CSV files and user game state saved in an a JSON encoded table. i.e. At least two files: (at least one) for game data and (at least one) for game state

General Comments

  • It sounds like AppInventor used to do all the heavy lifting for GUIs for you.
  • Thus, from your point of view there was just one way to make a GUI (the way AppInventor implemented them).
  • Now, you’re working with a Software Development Kit (SDK) that gives you lower level tools and features, from which you can design any behavior you want.
  • This is bad, because it means you cant just make a ‘button’ any more. Now you have to understand the GUIs concepts/differences between push buttons, radio buttons, toggle buttons, etc. AND you need to understand Solar2D features well enough to code/express those behaviors.
  • This is good, but knowing the above you can highly customize your GUIs.
  • Note: I gave you a basic push button with no bells and whistles, designed using basic features of Solar2D. Instead, you may want to start off using the built in widget system: Solar2D Documentation — API Reference | Libraries | widget
  • I don’t personally use it because I want total control of behavior and I prefer to code my own high level solutions, but it is suitable for most uses and may help you in the end.
  • In addition to (possibly switching) to widget.*, you sound like you need to start learning about game/app scenes. Solar2D comes with a scene manager Solar2D Documentation — API Reference | Libraries | composer or you can code your own.

To learn more about ‘basic’ DIY buttons look at the non_ssk folder in this example I made in 2020:

https://github.com/roaminggamer/RG_FreeStuff/raw/master/AskEd/2020/07/buttonHelp.zip

Thank you. As always, you provide very important and useful information. It will take me a long time to study all this.

Yes, AppInventor is the perfect solution for designers, storytellers, and others who have content but don’t have the coding skills and desire or ability to work in a team with real coders.

In addition, there are several independent projects based on AppInventor with advanced monetization options. Unfortunately, the one that suits me the most is in great difficulty, so I have to urgently look for a replacement for it.

The second reason is that this visual programming only makes Android apps, and I would like to make cross-platform apps in the future. So there are many ready-made solutions, many things are implemented simply, understandably and accessible for beginners. But, alas, the circumstances are such that I have to learn real programming.

@Texter

You mentioned you were remaking a AppInventor example. Can you provide a link to that example? I

I’d like to understand better exactly what you’re trying to replicate in case I have additional ideas for how to do it in Corona/Solar2D.

If this isn’t an exact AppInventor example (on their site), can you describe the game/app? OR, if it is similar to a game or game(s) we might know can you list the names of those apps/games?

I have already sent you a private message with a link to a working application and my explanations. I hope you received it. Thanks for your interest in this topic.