Ideal Scaling Calculator

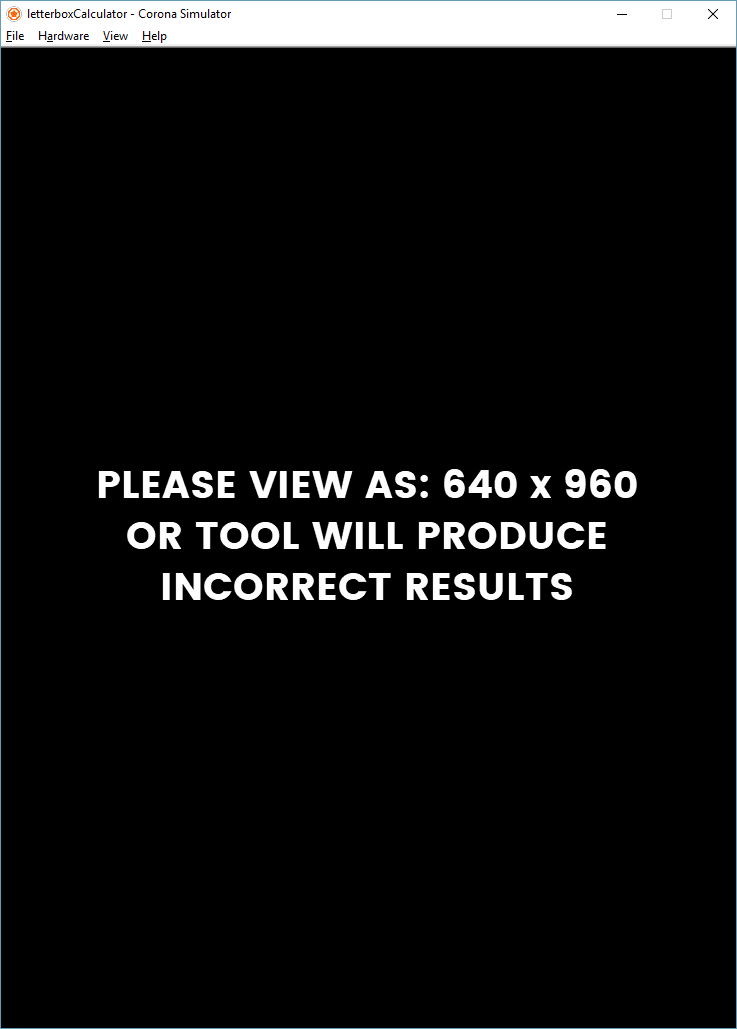
** WHEN USING THE TOOL - Run simulator at 640x960 to ensure the image is not scaled when generated**

I often see users get tripped up trying to figure out what the best image size is for some specific letterbox scaling.

For example, in a recent post a user had already worked on his game and then decided that the scaling he was using (zoomEven) was no good. So, he switched to letterbox, but then could not figure out the best background size that would never have ‘black bars’.

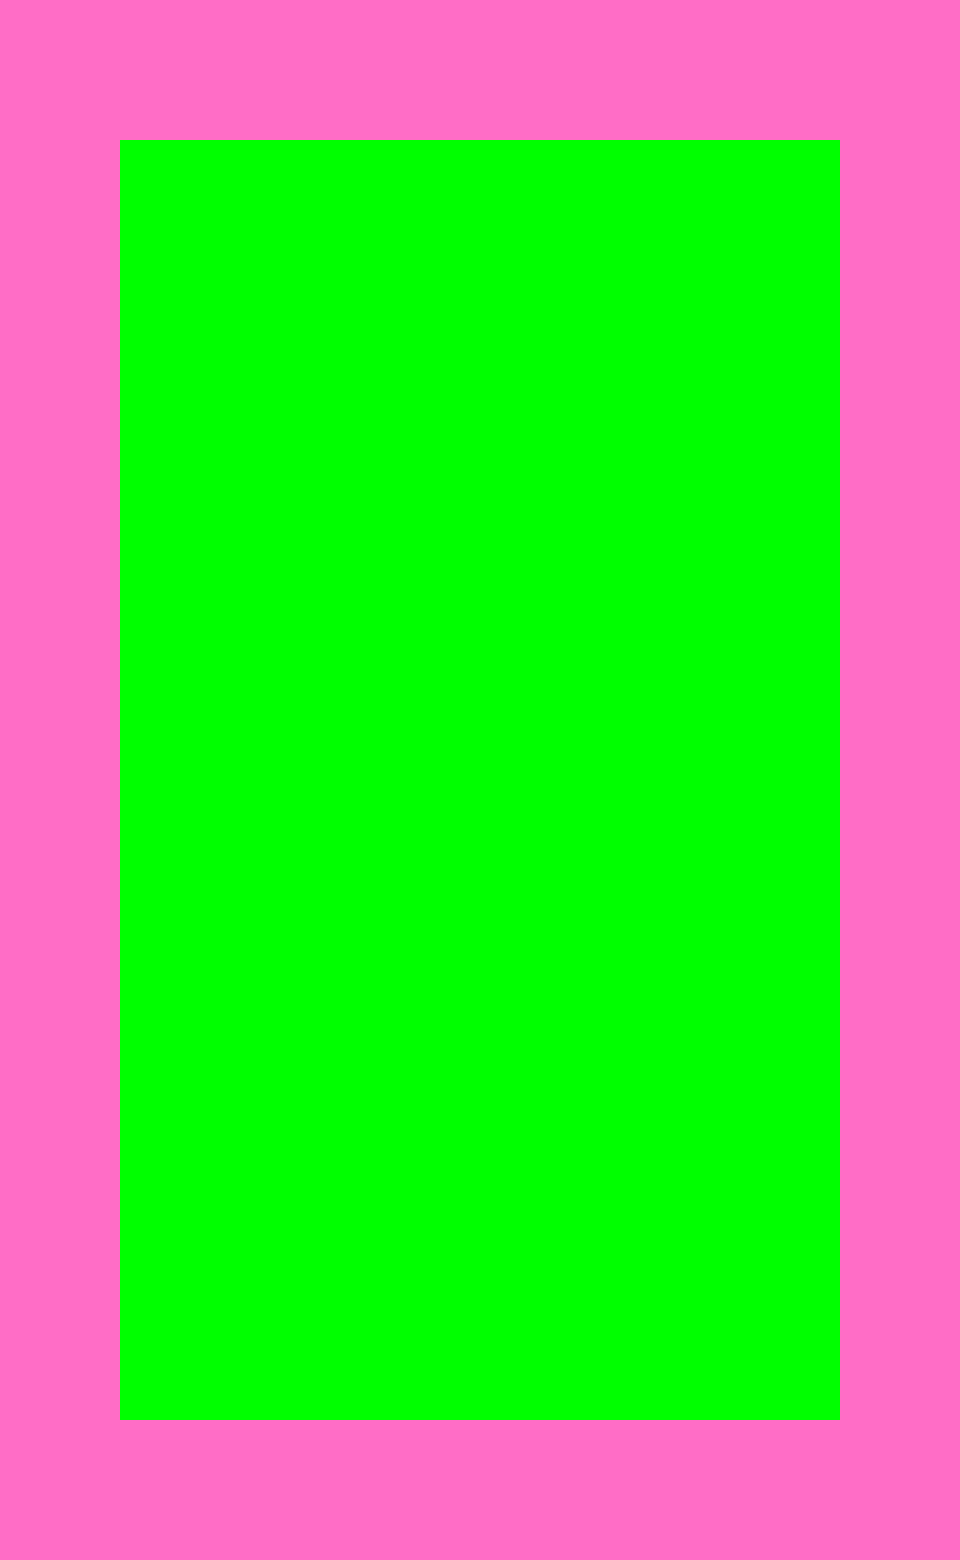
What he essentially needed was a way to calculate the ideal texture size and know both the ‘bleed areas’ (shown on some devices and not on others) and the ‘safe areas’ (shown on all devices).

I personally use a recipe of 640 x 960 letterbox with this texture showing bleed and safe areas:

protoBackX.png

That was useless to answer this question.  He wanted to use 768 x 1024 and I didn’t know the ideal size for that.

So… I made a tool to figure it out.

In short, you can now choose any size you want for the content area (in config.lua) and select letterbox as the scaling.

Then, run my tool and select your resolution from the list.  

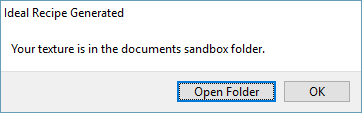
Finally, look in the documents sandbox area and there will be a texture of the proper dimensions:

  • pink is bleed
  • green is safe

Here is the image for 768 x 1024 letterbox:

ideal.png

The Code: https://github.com/roaminggamer/RG_FreeStuff/raw/master/AskEd/2018/06/letterboxCalculator.zip

https://www.youtube.com/watch?v=6LQSfwj8gto&feature=youtu.be

PS -

If anyone finds any issues with this please let me know, but also please supply a mini-project showing the issue to save me time debugging it OK?

Thanks!

2 Likes

Just recommitted.  I deleted a file in the original commit.  Now it runs.  Sorry!

Note: You don’t modify the config.lua file for my tool.  It doesn’t care.

What I’m saying above is, if you decide your ideal resolution is ‘720x1280’, you could run my tool and select ‘720x1280’ from the drop down.

You would then find that the ideal texture to eliminate black bars would be: ‘960x1560’ with a safe area in the center of ‘720x1280’.

ideal2.png

Easy Peasy.

Thank you for this great tool @roaminggamer!

One question, when you select 640x960 it shows 720x1386 but in my sandbox, I see that it creates a file with dimensions 1215x2338 which is also the case for other dimensions. File dimensions are not the same what I see on console. Should I take this into consideration or should I work with the dimensions I see in the console? (I see this works as expected in the video but I don’t know what mixes things up on my PC!)

Please clarify:

  1. Windows or OS X? You say PC and while I think Windows when I hear PC, a Mac is a PC so… just checking.

  2. What OS Version?  Windows 7, Windows 10, …

  3. What device are you simulating?  i.e. What Resolution are you running the simulator at.  It should not affect things, but I’d still like to know.

  4. What version of Corona?

My answers to above:

1 + 2. Windows 10

  1. I was using 640x960.  However, I just tried iPad Pro and found the texture size for 640x960 which should have produced an ideal resolution of 720 x 1386 instead produced a texture of:1265 x 2436.

  2. Corona 2018.3297

With regards to #3.  The console still prints the right info:

16:30:18.719  Content Area: 640 960

16:30:18.719  640 960 720 1386

,and if I take the image and scale it to 720x1386, the safe area and bleed areas are still correct.  So, it look like the simulator is producing a scaled image.  I’ll see if I can fix that, but for now be aware that the image that is produced may not be the same size as the log output.  You can however rescale it to get a proper image map.

Actually, I think the takeaway it to run the simulator at borderless 640x960 when using this tool so the simulator scaling is 1:1.

:slight_smile:

OS: Windows 10

Corona version: 2018.3316

Skin: iPhone 6 Plus (1080x1920)

After following your advice and running the tool with 640x960, it works as expected. Dimensions on console == Dimensions of file.

I just updated the tool to:
 

  1. Warn you if you’re using the wrong resolution when running the tool.
  2. Prompt you with a dialog after generating to help you find the generated texture.

wrongres.png
prompt.png

Your brain is a killer coding machine! roaminggamer rocks baby…

This thing is awesome! Thank you!

You’re welcome. I’m glad it can be of use still.