Replace specific color with another color in place in an image

I have an sprite that contains a specific color I would like to replace with another color in code. What is the best way of doing this in place? Should I use a custom shader? I didnt find anything in the build in effects that achieve this. Maybe I am wrong though.

Thanks

Hi @kevinlboehme,

If a custom shader can do what you need it to (effectively make it appear that a specific color has been replaced) then yes, you should explore that route. There is no way to dynamically swap out colors of a sprite.

Best regards,

Brent

Thanks for the response. I figured something out that works for my purposes. This code just looks for a specific color that has a red value greater than .9 and a blue value less than .5. Its pretty awful but so was trying to get this to match on an exact RGB value! If anyone knows how to do that please advise.
 

local kernel = {} kernel.language = "glsl" kernel.category = "filter" -- By default, the group is "custom" -- kernel.group = "custom" kernel.name = "replace" -- Expose effect parameters using vertex data kernel.vertexData = { { name = "r", -- The property name exposed to Lua default = .5, min = 0, max = 1, index = 0, -- This corresponds to CoronaVertexUserData.x }, { name = "g", -- The property name exposed to Lua default = .5, min = 0, max = 1, index = 1, -- This corresponds to CoronaVertexUserData.y }, { name = "b", -- The property name exposed to Lua default = .5, min = 0, max = 1, index = 2, -- This corresponds to CoronaVertexUserData.z }, } kernel.fragment = [[P\_COLOR vec4 FragmentKernel( P\_UV vec2 texCoord ){ P\_COLOR vec4 texColor = texture2D( CoronaSampler0, texCoord ); P\_COLOR float r = CoronaVertexUserData.x; P\_COLOR float g = CoronaVertexUserData.y; P\_COLOR float b = CoronaVertexUserData.z; if (texColor[0] \> 0.9 && texColor[2] \< .5) { texColor[0] = r; texColor[1] = g; texColor[2] = b; } return CoronaColorScale(texColor); } ]] return kernel

Four years later, here’s a custom shader that can replace two colors in an image…

local kernel = {}

kernel.language = "glsl"
kernel.category = "filter"
-- By default, the group is "custom"
--kernel.group = "custom"
kernel.name = "swap"

-- Expose effect parameters using vertex data
kernel.uniformData  = {
  {
    name = "key1", -- color to key
    default = { 1, 1, 1, 1 },
    min = { 0, 0, 0, 0 },
    max = { 1, 1, 1, 1 },
    type="vec4",
    index = 0, -- u_UserData0
  },
  {
    name = "color1",
    default = { 1, 1, 1, 1 },
    min = { 0, 0, 0, 0 },
    max = { 1, 1, 1, 1 },
    type="vec4",
    index = 1, -- u_UserData1
  },
  {
    name = "key2",
    default = { 1, 1, 1, 1 },
    min = { 0, 0, 0, 0 },
    max = { 1, 1, 1, 1 },
    type="vec4",
    index = 2, -- u_UserData2
  },
  {
    name = "color2",
    default = { 1, 1, 1, 1 },
    min = { 0, 0, 0, 0 },
    max = { 1, 1, 1, 1 },
    type="vec4",
    index = 3, -- u_UserData3
  },
}

kernel.fragment = [[

uniform P_COLOR vec4 u_UserData0; // key1
uniform P_COLOR vec4 u_UserData1; // color1
uniform P_COLOR vec4 u_UserData2; // key2
uniform P_COLOR vec4 u_UserData3; // color2

P_COLOR vec4 FragmentKernel( P_UV vec2 texCoord )
{
  P_COLOR vec4 texColor = texture2D( CoronaSampler0, texCoord );
  if (texColor[0] == u_UserData0[0] && texColor[1] == u_UserData0[1] && texColor[2] == u_UserData0[2] )
    { texColor[0] = u_UserData1[0];
      texColor[1] = u_UserData1[1];
      texColor[2] = u_UserData1[2];
    }
  if (texColor[0] == u_UserData2[0] && texColor[1] == u_UserData2[1] && texColor[2] == u_UserData2[2] )
    { texColor[0] = u_UserData3[0];
      texColor[1] = u_UserData3[1];
      texColor[2] = u_UserData3[2];
    }
  return CoronaColorScale(texColor);
}
]]

graphics.defineEffect( kernel )

object.fill.effect = "filter.custom.swap"
object.fill.effect.key1 = { 213/255, 95/255, 96/255 }
object.fill.effect.color1 = { 93/255, 144/255, 191/255 }
object.fill.effect.key2 = { 141/255, 76/255, 101/255 }
object.fill.effect.color2 = { 88/255, 92/255, 138/255 }
2 Likes

Hey, thank you for that code!

Works perfectly for me swapping 2 colors.
But in my case I need more colors to swap. So I tried to add a 3rd one, but something I may do wrong here.

kernel.language = "glsl"
kernel.category = "filter"
-- By default, the group is "custom"
--kernel.group = "custom"
kernel.name = "swap"

-- Expose effect parameters using vertex data
kernel.uniformData  = {
  {
    name = "key1", -- color to key
    default = { 1, 1, 1, 1 },
    min = { 0, 0, 0, 0 },
    max = { 1, 1, 1, 1 },
    type="vec4",
    index = 0, -- u_UserData0
  },
  {
    name = "color1",
    default = { 1, 1, 1, 1 },
    min = { 0, 0, 0, 0 },
    max = { 1, 1, 1, 1 },
    type="vec4",
    index = 1, -- u_UserData1
  },
  {
    name = "key2",
    default = { 1, 1, 1, 1 },
    min = { 0, 0, 0, 0 },
    max = { 1, 1, 1, 1 },
    type="vec4",
    index = 2, -- u_UserData2
  },
  {
    name = "color2",
    default = { 1, 1, 1, 1 },
    min = { 0, 0, 0, 0 },
    max = { 1, 1, 1, 1 },
    type="vec4",
    index = 3, -- u_UserData3
  },
 	{
    name = "key3",
    default = { 1, 1, 1, 1 },
    min = { 0, 0, 0, 0 },
    max = { 1, 1, 1, 1 },
    type="vec4",
    index = 4, -- u_UserData4
  },
  {
    name = "color3",
    default = { 1, 1, 1, 1 },
    min = { 0, 0, 0, 0 },
    max = { 1, 1, 1, 1 },
    type="vec4",
    index = 5, -- u_UserData5
  },
}

kernel.fragment = [[

  uniform P_COLOR vec4 u_UserData0; // key1
  uniform P_COLOR vec4 u_UserData1; // color1
  uniform P_COLOR vec4 u_UserData2; // key2
  uniform P_COLOR vec4 u_UserData3; // color2
  uniform P_COLOR vec4 u_UserData4; // key3
  uniform P_COLOR vec4 u_UserData5; // color3

  P_COLOR vec4 FragmentKernel( P_UV vec2 texCoord )
  {
    P_COLOR vec4 texColor = texture2D( CoronaSampler0, texCoord );
    if (texColor[0] == u_UserData0[0] && texColor[1] == u_UserData0[1] && texColor[2] == u_UserData0[2] )
      { texColor[0] = u_UserData1[0];
        texColor[1] = u_UserData1[1];
        texColor[2] = u_UserData1[2];
      }
    if (texColor[0] == u_UserData2[0] && texColor[1] == u_UserData2[1] && texColor[2] == u_UserData2[2] )
      { texColor[0] = u_UserData3[0];
        texColor[1] = u_UserData3[1];
        texColor[2] = u_UserData3[2];
      }
    if (texColor[0] == u_UserData4[0] && texColor[1] == u_UserData4[1] && texColor[2] == u_UserData4[2] )
      { texColor[0] = u_UserData5[0];
        texColor[1] = u_UserData5[1];
        texColor[2] = u_UserData5[2];
      }
    return CoronaColorScale(texColor);
  }
]]

graphics.defineEffect( kernel )
object.fill.effect = "filter.custom.swap"    	
object.fill.effect.key1 = { 223/255, 223/255, 223/255 }
object.fill.effect.color1 = { 243/255, 196/255, 163/255 }
object.fill.effect.key2 = { 191/255, 191/255, 191/255 }
object.fill.effect.color2 = { 202/255, 117/255, 101/255 }
object.fill.effect.key3 = { 147/255, 147/255, 147/255 }
object.fill.effect.color3 = { 96/255, 64/255, 62/255 }

This is the raw file:
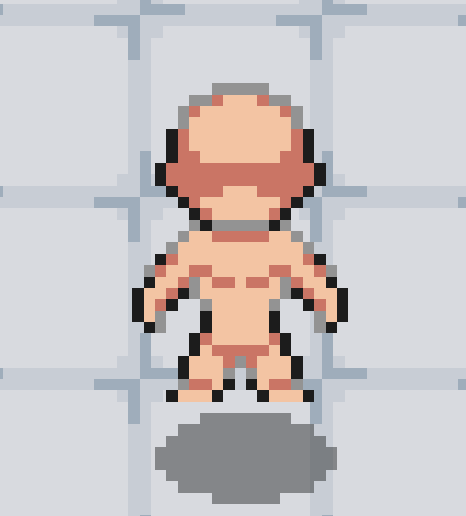
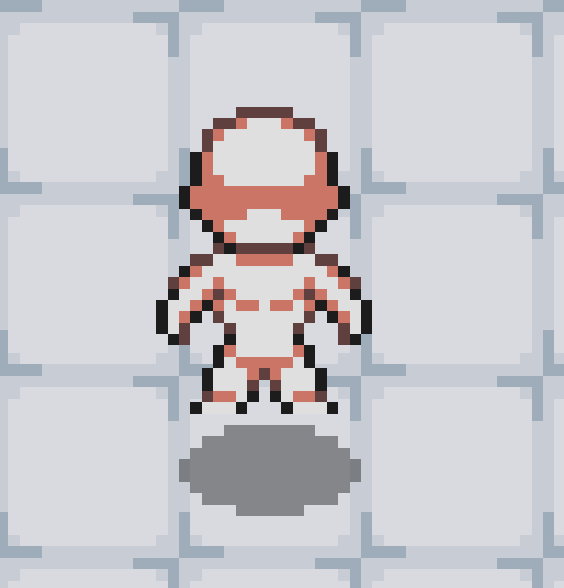
grey
This is the result I want:
colored
This is what I get swapping 2 colors with your code:
(Only one color left to swap, the light grey)

This is what I get using my code with swapping 3 colors:

What am I doing wrong?
Do you have any clue when you see my code?

Thank you very much!

Ok I think I know the reason…
“kernel.uniformData” can hold only up to 4 parameters…

Tried to swap one color step by step. But the effect overwrites itself, so only the last swap sustains.
Really need something that can swap unlimited amount of colors.

Ok, I got it!
For those who are interested:
Here’s a shader that can swap unlimited amounts of colors.

You can copy paste it and save as a module to your project.

local shader = {}
local kernel = {}

kernel.language = "glsl"
kernel.category = "filter"
--kernel.group = "custom"
kernel.name = "multiswap"

kernel.uniformData = {
  {
    name = "keys",
    default = {
      1.0, 1.0, 1.0, 1.0,
      1.0, 1.0, 1.0, 1.0,
      1.0, 1.0, 1.0, 1.0,
      1.0, 1.0, 1.0, 1.0
    },
    min = {
      0.0, 0.0, 0.0, 0.0,
      0.0, 0.0, 0.0, 0.0,
      0.0, 0.0, 0.0, 0.0,
      0.0, 0.0, 0.0, 0.0
    },
    max = {
      1.0, 1.0, 1.0, 1.0,
      1.0, 1.0, 1.0, 1.0,
      1.0, 1.0, 1.0, 1.0,
      1.0, 1.0, 1.0, 1.0
    },
    type="mat4",
    index = 0
  },
  {
    name = "colors",
    default = {
      1.0, 1.0, 1.0, 1.0,
      1.0, 1.0, 1.0, 1.0,
      1.0, 1.0, 1.0, 1.0,
      1.0, 1.0, 1.0, 1.0
    },
    min = {
      0.0, 0.0, 0.0, 0.0,
      0.0, 0.0, 0.0, 0.0,
      0.0, 0.0, 0.0, 0.0,
      0.0, 0.0, 0.0, 0.0
    },
    max = {
      1.0, 1.0, 1.0, 1.0,
      1.0, 1.0, 1.0, 1.0,
      1.0, 1.0, 1.0, 1.0,
      1.0, 1.0, 1.0, 1.0
    },
    type="mat4",
    index = 1
  }
}

kernel.fragment = [[
uniform P_COLOR mat4 u_UserData0; // keys
uniform P_COLOR mat4 u_UserData1; // colors
P_COLOR vec4 FragmentKernel( P_UV vec2 texCoord )
{
  P_COLOR vec4 texColor = texture2D( CoronaSampler0, texCoord );
  for(int i = 0; i < 50; i++)
    {
    P_COLOR vec4 keys = u_UserData0[i];
    P_COLOR vec4 colors = u_UserData1[i];
    if ((abs(texColor[0] - keys[0]) < 0.01) && (abs(texColor[1] - keys[1]) < 0.01) && (abs(texColor[2] - keys[2]) < 0.01))
      {
        texColor = colors;
        break;
      }
    }
  return CoronaColorScale(texColor);
}
]]
graphics.defineEffect( kernel )


shader.swap = function( object, fromColors, toColors )	

	local keys = {}
	local colors = {}

	for i=1,#fromColors do
		for ii=1,4 do
			if ii < 4 then
				table.insert(keys, fromColors[i][ii]/255)
				table.insert(colors, toColors[i][ii]/255)
			else
				table.insert(keys, 1)
				table.insert(colors, 1)
			end
		end
	end

	object.fill.effect = "filter.custom.multiswap"
	object.fill.effect.keys = keys
	object.fill.effect.colors = colors
end


return shader

This is how you use it:
Just create 2 tables with the colors you want to change.
In this example we swap 3 colors.

local shader = require "shader"
local fromColor = {
	{ 223, 223, 223 },
	{ 191, 191, 191 },
	{ 147, 147, 147 }
}
local toColor = {
	{ 243, 196, 163 },
	{ 202, 117, 101 },
	{ 96, 64, 62 }
}
shader.swap( YOUR-OBJECT, fromColor, toColor )

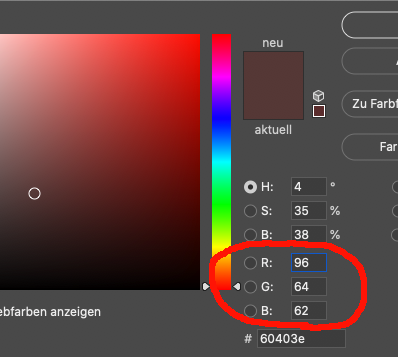
The color codes are RGB, you get from software like photoshop.
rgb

NOTE:
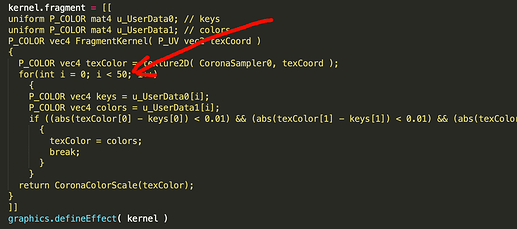
Right now the module can swap 50 colors.
If you want to have more, just adjust the value within the modules for-loop:

Hope that helps someone.

4 Likes

Sorry guys, blame on me, the thing isn’t working as promised… It can only convert up to 4 colors, not unlimited.
Please give credits to this guy.


I used his shader which can swap up to 4 colors and tried to create an unlimited one.
Testes several things but unfortunately not able to make it working.

I’ve also read more about custom shader and now I know, that I don’t want to use a shader anymore.
Why? Because the results are not guaranteed on all devices.
I wanted to use it for player customization, such as skin color, hair color.
I can not risk, that the skins look wrong on some devices, so I just save all color variations as single images instead.

You beat me to it. Yes, I had added 4 colors, but that’s as much as you can pass to a Corona Shader.

That said, you could pass a second image with a color map, but that’s not something I would want to work on.

Thanks for your awesome shader!

If you are doing this for pixel art only, then “Pixelation” should be solve the device guaranteed problem by modifying the shader you provide:

– 4 color pixel swapping
…
…
…
kernel.vertex =
[[
varying P_UV vec2 slot_size;
varying P_UV vec2 sample_uv_offset;
P_POSITION vec2 VertexKernel( P_POSITION vec2 position )
{
P_UV float numPixels = 1;
slot_size = ( u_TexelSize.zw * numPixels );
sample_uv_offset = ( slot_size * 0.5 );
return position;
}
]]

kernel.fragment =
[[
varying P_UV vec2 slot_size;
varying P_UV vec2 sample_uv_offset;

uniform P_COLOR mat4 u_UserData0; // trgtC
uniform P_COLOR mat4 u_UserData1; // toC
P_NORMAL float deadZone = 0.01;

P_COLOR vec4 FragmentKernel( P_UV vec2 texCoord )
{
P_UV vec2 uv = ( sample_uv_offset + ( floor( texCoord / slot_size ) * slot_size ) );
P_COLOR vec4 texColor = texture2D( u_FillSampler0, uv );

for(int i = 0; i < 4; i++){
P_COLOR vec4 keys = u_UserData0[i];
P_COLOR vec4 colors = u_UserData1[i];
if ((abs(texColor[0] - keys[0]) < deadZone) && (abs(texColor[1] - keys[1]) < deadZone) && (abs(texColor[2] - keys[2]) < deadZone)){
texColor = colors;
break;
}
}
return CoronaColorScale(texColor);
}
]]

I have tested, it works. you can event enlarge the scale while keeping it pixel perfect.

As for the unlimited color, I suggest you could create a container via display.newContainer() and using display.save() to save the shader applied image to temporary folder. load it up to apply the same shader with another set of uniformData, save it and delete previous one. repeat it as you need.

the pro of this approach: the final image will decoupled with color swap shader, so you can apply another different cool shader on it.
the con: it’s cumbersome and tediously.

BTW I’m trying to deal it with composite shader, the thought is create a color palette which using “r” value as the key and load it to 2nd texture, swap the image color via it’s “r” value matching the palette. I will post again if that works.

Here is the “Pixelate Palette Swap” shader I’ve done, feel free to use it and hope it helps!

–[[
USAGE:

For Art Part:
Method A, from scratch:
Open your graphic editor, mine is Aseprite.
1.Create a 4x4 pixels blank palette, make sure it’s SQUARE(Range: from 2x2 to 16x16).
the index format in 4x4 will be:
0, 1, 2, 3,
4, 5, 6, 7,
8, 9, 10, 11,
12, 13, 14, 15,

2.At index[0], this will be the background color, leave the value of "Blue and Alpha Channels to 0". (Alpha to 1 if you're using background for ur art)
3.For index[1]~index[15], assign the value of "Blue Channel form 1 to 15 that matching the index".
4.In index[1]~index[15], tweak the value of "R and G Channel as you like" (mainly for the readibility of creating art)
5.Save it as "moldPalette.png".
6.Make art with the palette, "make sure file size is SQUARE", save it as "moldSprite.png".  (Tip: set the color mode to index, so you won't get error by accidently changed the Blue Channel)
7.Load moldPalette, change the colors as you need, save it as "swapPalette.png".

Method B, from exist image:
1.Create "temporaryPallete":
  Open the image you have created in Aseprite, click the "Option icon" above the palette, then choose "New palette from sprite". 
  Click the "Option icon", choose "save the palette" and save it as "temporaryPallete.png". 
  (if you are not using Aseprite, see if your graphic editor had the similiar function. if not, make the palette manually)
2.Create "swapPallete":
  open temporaryPalette, set the sprite canvas to squre(4x4 or 6x6..etc).
  keep the RGBA of TopLeft pixel all 0, arrange the other colors in order you like.
  save the it as "swapPalette.png".
  
3.Create "moldPalette":
  Open swapPalette, Run Method A form operation 2.~6.

In Lua file:
1.require ("kernel_composite_pixelate_paletteSwap’)
2.local _textureRatio = “width/height of swapPalette.png” / “width/height of moldSprite.png”.
if your palette size if 4x4 and sprite size is 32x32, then _textureRatio = 4/32
3.local _paletteRowCols = “width/height of swapPalette.png”
if your palette size if 4x4, then _paletteRowCols = 4

4.Load the shader
local _optImg = {
type=“composite”,
paint1={ type=“image”, filename= “moldSprite.png” },
paint2={ type=“image”, filename= “swapPalette.png” }
}
spr.fill = _optImg
spr.fill.effect = “composite.pixelate.paletteSwap”
spr.fill.effect.textureRatio = _textureRatio
spr.fill.effect.paletteRowCols = _paletteRowCols

DONE!

–]]

local kernel = {}
kernel.language = “glsl”
kernel.category = “composite”
kernel.group = “pixelate”
kernel.name = “paletteSwap”

kernel.vertexData =
{
{
name = “textureRatio”,
default = 1,
min = 0,
max = 9999,
index = 0, – v_UserData.x; use a_UserData.x if #kernel.vertexData == 1 ?
},
{
name = “paletteRowCols”,
default = 4,
min = 1,
max = 16, – 16x16->256
index = 1, – v_UserData.y
},
}

kernel.vertex =
[[
varying P_UV vec2 slot_size;
varying P_UV vec2 sample_uv_offset;

P_POSITION vec2 VertexKernel( P_POSITION vec2 position )
{
slot_size = vec2( u_TexelSize.z, u_TexelSize.w ) * v_UserData.x; // multiply textureRatio to get matching UV of palette.
sample_uv_offset = ( slot_size * 0.5 );
return position;
}
]]

kernel.fragment =
[[
varying P_UV vec2 slot_size;
varying P_UV vec2 sample_uv_offset;

const P_COLOR float TICK_COLOR = 0.0039; // TICK_COLOR > 1/255, so you can get interger from floor( keyRGB / TICK_COLOR )
P_DEFAULT float paletteRowCols = v_UserData.y;
P_DEFAULT float tickUV = 1 / paletteRowCols;

P_UV vec2 getSwapUV(P_DEFAULT float keyRGB)
{
P_DEFAULT float indColor = floor( keyRGB / TICK_COLOR); // Swap Color Index: will be integer from 0~255.

P_DEFAULT float indX = indColor - floor( indColor / paletteRowCols) * paletteRowCols;
P_DEFAULT float indY = floor( indColor / paletteRowCols);

P_DEFAULT float uSwap = ( indX + 0.5 ) * tickUV ; // Get the color from central point to matching the color you assigned in palette
P_DEFAULT float vSwap = ( indY + 0.5 ) * tickUV ;

return vec2(uSwap,vSwap);
}

P_COLOR vec4 FragmentKernel( P_UV vec2 texCoord )
{
// Get Image Color
P_UV vec2 uv_offset = ( sample_uv_offset + ( floor( texCoord / slot_size ) * slot_size ) );
P_COLOR vec4 texColor = texture2D( u_FillSampler0, uv_offset );

// Get Palette Color
P_UV vec2 uv_swap = getSwapUV( texColor.b ); // Pick one of r,g,b as key according to your image
P_COLOR vec4 swapColor = texture2D( u_FillSampler1, uv_swap );

// Swap color
texColor = swapColor;

return CoronaColorScale(texColor);
}
]]

graphics.defineEffect( kernel )

1 Like