Is it possible to use a text object as a display mask so that the contents (players score for example) could be updated but you’re still able to see ‘through it’ to what ever it is masking.
Hope I’ve explained it well enough

Is it possible to use a text object as a display mask so that the contents (players score for example) could be updated but you’re still able to see ‘through it’ to what ever it is masking.
Hope I’ve explained it well enough
Hello,
To update the text you have only to do that :
myText.Text="New text"
To see through an object you can use alpha. Set an alpha of 0.5 to the text and you will be able to see through it
Do you talk of mask as corona mask? https://docs.coronalabs.com/guide/media/imageMask/index.html
I know how to update the text, but what I’d like is to use the text as a mask so that the characters look like they have an animated fill.
You probably could do this if you used the snapshot feature, but that would imply a one frame penalty every time you need to update the mask.
That would be ok as the mask would only need to be updated once every couple of munites or so.
I’ve never used masks or snapshots other than a passing glance. How easy would it be?
I don’t have an immediate answer for you, but this should not be too hard. I’ll get back to you on this thread when I have a chance with some code.
I guess your idea is to animate something behind a rect and have that show through?
If it makes sense, you might want to populate a canvas and assign that as the text object’s fill, updating the contents. This is similar to the snapshot approach.
I do remember mentioning text masks, probably here. I imagine I’ll write an example for that plugin at some point.
Probably not exactly what you are looking for, but it is a starting point:
https://github.com/roaminggamer/RG_FreeStuff/raw/master/AskEd/2018/05/textAsMask.zip
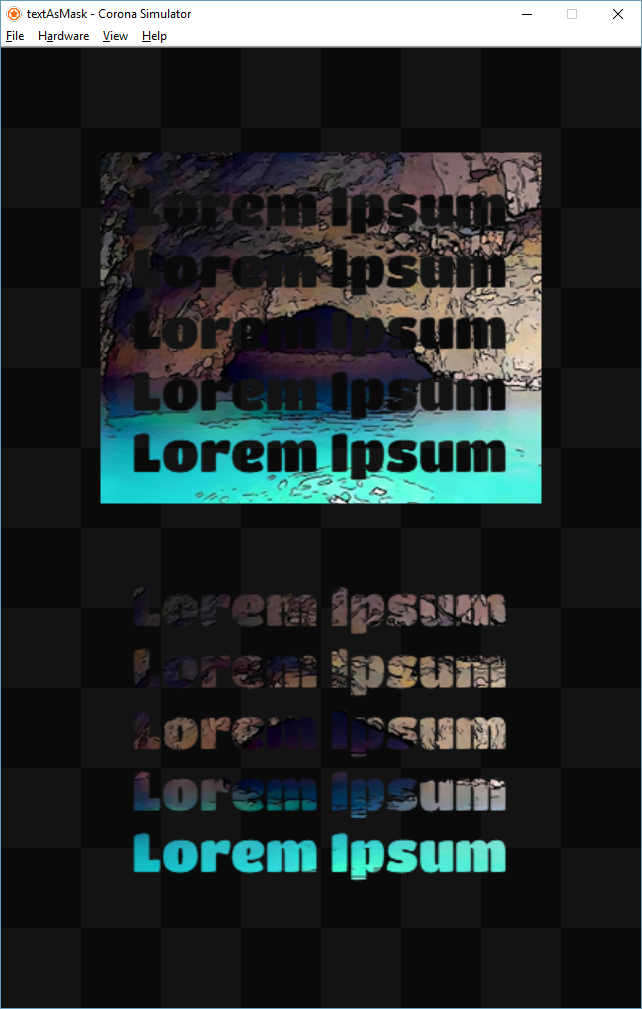
io.output():setvbuf("no") display.setStatusBar(display.HiddenStatusBar) -- ===================================================== -- ===================================================== local back = display.newImageRect( "protoBackX.png", 720, 1386 ) back.x = display.contentCenterX back.y = display.contentCenterY if( display.contentWidth \> display.contentHeight ) then back.rotation = 90 end -- ===================================================== -- ===================================================== local cx = display.contentCenterX local cy = display.contentCenterY local function mask( width, height, maskName, fontSize, text) local maskSrc = display.newContainer( width, height ) maskSrc.x = cx maskSrc.y = cy local visible = display.newRect( maskSrc, 0, 0, width-6, height-6 ) visible:setFillColor(1,1,1) local label = display.newText(maskSrc, text, 0, 0, "TitanOne-Regular.ttf", fontSize) label:setFillColor(0,0,0) display.save( maskSrc, { filename=maskName, baseDir=system.DocumentsDirectory, captureOffscreenArea=true, backgroundColor={0,0,0,1} }) display.remove( maskSrc ) end local function mask\_inverse( width, height, maskName, fontSize, text) local maskSrc = display.newContainer( width, height ) maskSrc.x = cx maskSrc.y = cy local label = display.newText(maskSrc, text, 0, 0, "TitanOne-Regular.ttf", fontSize) label:setFillColor(1,1,1) display.save( maskSrc, { filename=maskName, baseDir=system.DocumentsDirectory, captureOffscreenArea=true, backgroundColor={0,0,0,1} }) display.remove( maskSrc ) end -- ===================================================== -- ===================================================== mask( 300, 240, "mask1.png", 36, "Lorem Ipsum\nLorem Ipsum\nLorem Ipsum\nLorem Ipsum\nLorem Ipsum" ) mask\_inverse( 300, 240, "mask2.png", 36, "Lorem Ipsum\nLorem Ipsum\nLorem Ipsum\nLorem Ipsum\nLorem Ipsum" ) local img1 = display.newImageRect( "cave.png", 320, 240 ) img1.x = cx img1.y = cy - 200 local mask1 = graphics.newMask( "mask1.png", system.DocumentsDirectory) img1:setMask(mask1) img1:scale(1.5,1.5) local img2 = display.newImageRect( "cave.png", 320, 240 ) img2.x = cx img2.y = cy + 200 local mask2 = graphics.newMask( "mask2.png", system.DocumentsDirectory) img2:setMask(mask2) img2:scale(1.5,1.5)@RoamingGamer - That’s brilliant. As soon as I get a chance to play about with it I’ll report back and let you know how I’ve got on.
Well, it’s nothing glamorous, but I’ve attached a GIF from a quick text-masking sample I made a couple days back.
This reads from a font directly, rather than saving an intermediate image. (I’m also attempting to get around the need to disguise the fonts as text to make Android happy, but so far it’s a WIP at best.)
Code (still rather messy) here. I’ll try to tidy it up and spruce up the sample itself in the not-too-distant future.
Hello,
To update the text you have only to do that :
myText.Text="New text"
To see through an object you can use alpha. Set an alpha of 0.5 to the text and you will be able to see through it
Do you talk of mask as corona mask? https://docs.coronalabs.com/guide/media/imageMask/index.html
I know how to update the text, but what I’d like is to use the text as a mask so that the characters look like they have an animated fill.
You probably could do this if you used the snapshot feature, but that would imply a one frame penalty every time you need to update the mask.
That would be ok as the mask would only need to be updated once every couple of munites or so.
I’ve never used masks or snapshots other than a passing glance. How easy would it be?
I don’t have an immediate answer for you, but this should not be too hard. I’ll get back to you on this thread when I have a chance with some code.
I guess your idea is to animate something behind a rect and have that show through?
If it makes sense, you might want to populate a canvas and assign that as the text object’s fill, updating the contents. This is similar to the snapshot approach.
I do remember mentioning text masks, probably here. I imagine I’ll write an example for that plugin at some point.
Probably not exactly what you are looking for, but it is a starting point:
https://github.com/roaminggamer/RG_FreeStuff/raw/master/AskEd/2018/05/textAsMask.zip
io.output():setvbuf("no") display.setStatusBar(display.HiddenStatusBar) -- ===================================================== -- ===================================================== local back = display.newImageRect( "protoBackX.png", 720, 1386 ) back.x = display.contentCenterX back.y = display.contentCenterY if( display.contentWidth \> display.contentHeight ) then back.rotation = 90 end -- ===================================================== -- ===================================================== local cx = display.contentCenterX local cy = display.contentCenterY local function mask( width, height, maskName, fontSize, text) local maskSrc = display.newContainer( width, height ) maskSrc.x = cx maskSrc.y = cy local visible = display.newRect( maskSrc, 0, 0, width-6, height-6 ) visible:setFillColor(1,1,1) local label = display.newText(maskSrc, text, 0, 0, "TitanOne-Regular.ttf", fontSize) label:setFillColor(0,0,0) display.save( maskSrc, { filename=maskName, baseDir=system.DocumentsDirectory, captureOffscreenArea=true, backgroundColor={0,0,0,1} }) display.remove( maskSrc ) end local function mask\_inverse( width, height, maskName, fontSize, text) local maskSrc = display.newContainer( width, height ) maskSrc.x = cx maskSrc.y = cy local label = display.newText(maskSrc, text, 0, 0, "TitanOne-Regular.ttf", fontSize) label:setFillColor(1,1,1) display.save( maskSrc, { filename=maskName, baseDir=system.DocumentsDirectory, captureOffscreenArea=true, backgroundColor={0,0,0,1} }) display.remove( maskSrc ) end -- ===================================================== -- ===================================================== mask( 300, 240, "mask1.png", 36, "Lorem Ipsum\nLorem Ipsum\nLorem Ipsum\nLorem Ipsum\nLorem Ipsum" ) mask\_inverse( 300, 240, "mask2.png", 36, "Lorem Ipsum\nLorem Ipsum\nLorem Ipsum\nLorem Ipsum\nLorem Ipsum" ) local img1 = display.newImageRect( "cave.png", 320, 240 ) img1.x = cx img1.y = cy - 200 local mask1 = graphics.newMask( "mask1.png", system.DocumentsDirectory) img1:setMask(mask1) img1:scale(1.5,1.5) local img2 = display.newImageRect( "cave.png", 320, 240 ) img2.x = cx img2.y = cy + 200 local mask2 = graphics.newMask( "mask2.png", system.DocumentsDirectory) img2:setMask(mask2) img2:scale(1.5,1.5)@RoamingGamer - That’s brilliant. As soon as I get a chance to play about with it I’ll report back and let you know how I’ve got on.
Well, it’s nothing glamorous, but I’ve attached a GIF from a quick text-masking sample I made a couple days back.
This reads from a font directly, rather than saving an intermediate image. (I’m also attempting to get around the need to disguise the fonts as text to make Android happy, but so far it’s a WIP at best.)
Code (still rather messy) here. I’ll try to tidy it up and spruce up the sample itself in the not-too-distant future.