widget.newButton - More detail please

Hello all.  Newbie here trying to understand the nuances of widget.newButton…

I’m trying to build a simple inventory-list-app with a two-column display on my scene.

I have the left column of data displayed in a widget.newButton and left-aligned,

and the right column of data displayed in another widget.newButton and right-aligned.

I wish to be able to select a line of data by touching the left side (button), and edit the data if I touch the right side (button)…

My problem is, no matter where on the line I touch the data, I get the right(edit) side…

Example:

                    ItemA                     1

                    ItemB                     2

                    ItemC                     3

                      ^   

If I touch here, I get ‘3’ (not ‘ItemC’).

I have read, and re-read the API on widget.newButton, but can see no width parameters.

How do I control the WIDTH of the widget.newButton and constrain it to a fixed width - or perhaps the width of the text? -  Obviously the right(edit) side button created is far wider than the displayed text.

I am populating the screen with a for-loop that pulls in 10 items and corresponding locations from an array and generates and displays the buttons with the data.

Thanks for any assistance!  :slight_smile:

Make a two file (main.lua, config.lua) micro project showing what you’re doing so we can run it and see what you’ve done.

It is too hard to give concrete assistance based on just a description.

If you like, I have a basic starter project you can download and modify: https://github.com/roaminggamer/RG_FreeStuff/raw/master/AskEd/askEdStarter.zip

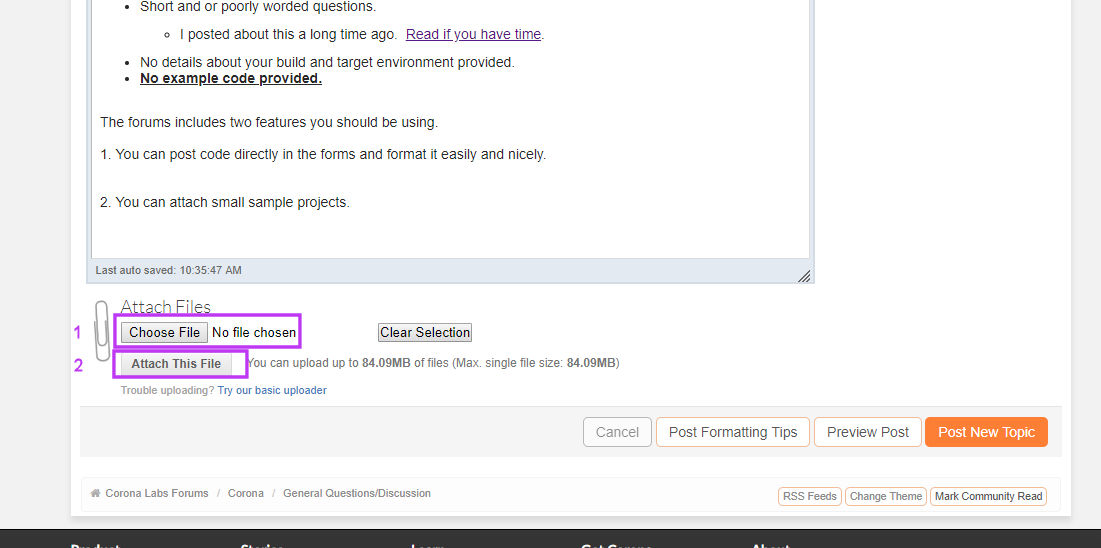
When you’re done, rename the folder, zip it up, and attach it to this thread by:

  1. Clicking ‘More Reply Options’ below.

  2. Then:  attaching_files.jpg

Question: You said you’ve read and re-read the API docs and ca’t find width?

These API docs: https://docs.coronalabs.com/api/library/widget/newButton.html

Just search the page for width, then depending on button constructions…

https://docs.coronalabs.com/api/library/widget/newButton.html#width-height-optional

https://docs.coronalabs.com/api/library/widget/newButton.html#width-height-required

https://docs.coronalabs.com/api/library/widget/newButton.html#width-height-required-1

PS - In questions, when you say you’ve read XYZ docs in a question always link the docs you mean.  That way we know where you’ve looked.

In this case, you may simply have been reading a guide when you thought you were reading the API docs?

This is the API docs home: https://docs.coronalabs.com/api/

Hello Ed.

Thank you for the feedback so far.

Realizing that I am learning as I go, I understand I might be going about this entirely wrong…

I hoped I was being succinct in my post, but obviously not.  The widget.newButton - buttons I have been creating have no background - text only, so the width parameter which only applies to the ‘rect’ or ‘roundedRect’ shapes doesn’t work for me (I don’t use either).

I see a textOnly parameter, but if I set that to ‘true’ my left -align formatting reverts to centered so that doesn’t help.

For your reference: Corona Version I Am Using: 2017.3184
                               OS I am building on: Windows 7 at work, and Windows 10 at home.

                                        - both environments exhibit the same symptoms
                               Target Device(s) I am Testing On - Corona Simulator only at this time
                               Target OS Version: Android 8.0.0 when I get to that stage…

I have copied the code verbatim from my working.lua module to your main.lua in the attached .zip file…   But it does not run in the main.lua - throws no error, but does nothing.  I’m sorry, but I don’t know enough yet to debug why it doesn’t work in main.lua.    I also edited your config.lua to match the parameters in my config.lua.

I have included a .png image of my working scene for your reference in the .zip file - it is called ‘scene.png’ - you will see my layout and hopefully the problem from that…  (please excuse the wanky name - it is an in-joke at work)

I an trying to build a list of items with a corresponding bin-location…     Temporarily I have colored the items yellow, and the bin-location white in an effort to determine what was happening with the button width, (but to no avail.)

I have also included the comma-separated-values .txt file of data I load in the module.

When I tap on the Item, I want it to change to ‘selected’, and if I tap on the bin-location, I want to be able to edit the details . - Hence why I want two buttons per entry line, but the button widths do not seem to match the text width, for example, If I click on the ‘p’ in Impellor, the adjacent ‘1’ activates. - Obviously the ‘1’ button width is far greater than the text width.

Also on this scene, I have four ‘control’ buttons…  ’ ^ '(scroll up),  ’ v '(scroll down), ‘Add Item’ and ‘Back’ which all work as intended.    The buttons for these ‘control’ items do not seem to match the text width either (they are all somewhat wider), but at least they do not overlap.   I’m a bit stumped as to what I can do to resolve this, and would appreciate any pointers you could give.

Hi Ed.    More playing with this has just revealed that I can select the Item in my list, if I tap just off the bin-location…  (wtf?)…

                               Impellor                                    1

If I click here…           ^                                                       result = ‘1’

If I click here…                                                         ^         result = ‘1’

If I click here                                                        ^             result = ‘Impellor’

Now I’m totally confused.   :frowning:

What is going on?

Thanks for any help…!

I don’t know if it is the increased width of the ‘1’ button, as on your third test you click a bit to the right of it and you get ‘Impellor’.

Hi.  I looked at your code and I have to ask you to try again.

Make a small example in main.lua that makes a few buttons.  Don’t copy your current project into main.  That won’t help.

This exercise has two purposes:

  1. It gives you a chance to focus on button making code outside of the context of all your other code.

Doing this may lead you to the source of your error.

2.  Failing that, you will then have a tiny example that still exhibits the problem which others can examine.

In any case, the example must at least run for me to help debug it.

Thanks,

Ed

PS - Almost all the code you need to achieve this exercise in duplicating your buttons is to be found right here: 

https://docs.coronalabs.com/api/library/widget/newButton.html

You don’t need any composer.* calls or anything like that.

@tezc - One additional question.  

Are you using composer.* in your project because you followed along with the guides and they showed composer.* code?

Or is your project copied and then modified from somewhere else?. i.e. Are you modifying an existing project you found?

I am asking this because I had a recent discussion with other long-time Corona users about whether composer should be introduced early or late to new users.  I personally think it should be introduced very late, because it causes situations like the one I’m seeing here.

You have some code you can’t get working and it is embedded in composer.* scene code that you’re not really familiar with.  Then, you’re asked to separate out the trouble code into a small testbench and you don’t know what to keep and what to throw away.

This is not your fault, but it does go to my argument that having new folks use composer early just makes training, learning, and getting help  more complicated.

Hello Ed.

I have succeeded in getting a working copy of just the code that I need to demonstrate the problem into the attached .zip file. :slight_smile:

  • Yes I am using ‘composer.*’ - but not sure yet why - If I can dispense with it, that would be GREAT! - I’m all for keeping things as simple as I can  - Also, haven’t mentioned thus far…   I do not intend for this app to be rotatable…  My expectation is that it will only ever run in portrait mode, and then only on a handful of tech’s phones at work, all running Android 8.0.0 or better…   We will also, not ever be offering this App to the marketplace, So I do not need to include anything extraneous that is not needed.     I will cross the ‘publishing’ bridge once I have the app doing everything we need it to, in the simulator. <_<

If I can resolve this ‘button’ issue, I’ll be well on my way. :slight_smile:

Thanks again for any assistance…

@ sdktester15…    Hence my confusion!   :wacko:


You’re drawing the buttons on top of each other. The last one will be the active one.  I wouldn’t do it the way you’re doing it. I would use the “shape” option and let the button have its own background instead of drawing a transparent background button on your own background rectangle, but if you want to go that way, set the width of the button and position the cx value accordingly. As of now both buttons have the same cx value and are the same width.

Rob

Hi Rob.

Thanks for chiming in on this for me :slight_smile:

I’m sure there is a better way to do this, but for now, this seems to be getting me what I need. (I did say I may well be doing this all wrong)  :smiley:

I think the penny has dropped - I think I now realize what is going on invisibly with my widget.newButton…   When you said I was placing the buttons on top of each other, I thought I had compensated for that with the offset, but then I realized the actual button is perhaps in one place, whilst the label is offset somewhere else…   :huh:   So I remmed out the ‘offset’ parameter in my parameter list and then shifted the actual button placement (changed the cx value of the button and it is working much better now.   I STILL have some weirdness, but It’s better than it was.    I still don’t see how to control the WIDTH of the button (as I’m displaying them) per your comment above “…set the width of the button and position the cx value…” - The buttons still seem to extend well beyond the width of the text.

I’ve found if I set the alignment for the bin-location button (the right-hand side button) to ‘left’ and set it’s cx value way off to the right, that seems to work ok for what I need - they no longer overlap.

Thanks for the assist!

Basically, widget buttons have a default width and height. Even if you can’t see it, you have to imagine them taking up a rectangle space on the screen.  When you align the text, you’re just shifting the text either left, right or centered in that invisible box. Corona text objects like the ones used in the label’s for the buttons are also a graphic rectangle, so not just the visual part of the text is touchable.

I’m not sure what your goal is by having the label touchable and the number touchable is, but your current code is drawing the exact same sized rectangles on top of each other and you can only touch the topmost one.

Can I post your code back here to the forum (at least the button creation code)?
 

Rob

Hi Rob.

Yes, thanks. - That was the crucial tid-bit of info I couldn’t quite grasp until your first post.

Now you sound like you’re not even certain how corona determines the width of the button!    By relocating the centers of my buttons outboard of my scene, and changing the alignment, I think I’ve managed to at least place the buttons so they no longer overlap, and still format the data on the scene how I want it.     It’s an interesting question as to how Corona determines how wide the button should be, but for my purposes, my code is now working acceptably.      I have no issue if you want to post my code up for others to learn from.    I’m all about sharing the knowledge!  :smiley:

Hi.  I’m just seeing this now.  I’ll follow up after a get some work done.

Gotta pay those bills first.

Back later.

The default button width varies depending on what theme you’re using. The iOS7+ theme for instance, the button’s default width is 180.

Here is the code I worked out based on what you started:

 for dispLine=0,9 do rowbg = display.newRect(cx,cy-165+(dispLine)\*38, fullw-40, 36) rowbg:setFillColor( .5, .3, .3 ) textItem = item[currentDisplayFrom+dispLine] buttonNm="btn"..(5+dispLine) local buttonItemName = widget.newButton( { id = buttonNm, label = textItem, font = native.systemFont, fontSize = 18, labelAlign = "left", --strokeColor = { default={ 1, 1, 1 }, over={ 0.4, 0.1, 0.2 } }, --strokeWidth = 4, --labelXOffset = -80, shape = "rect", height = 36, width = 230, labelColor = { default={ 1, 1, 0 }, over={ 0, 1, 1, 0.5 } }, fillColor = { default={ 1, 1, 1, 1 }, over={ 1, 0, 0, 0 } }, onEvent = handleButtonItemEvent } ) selectedItem = textItem buttonItemName.x = cx - 20 buttonItemName.y = cy -165+dispLine\*38 labelSection = (section[currentDisplayFrom+dispLine]) local buttonSectionName = widget.newButton( { id = buttonSection, label = labelSection, font = native.systemFont, fontSize = 18, labelAlign = "right", shape = "rect", width = 40, height = 36, --labelXOffset = 80, labelColor = { default={ 1, 1, 1 }, over={ 0, 1, 1, 0.5 } }, fillColor = { default={ 1, 0.9, 0.5, 0.7 }, over={ 1, 0.9, 0.7, 1 }}, onEvent = handleButtonSectionEvent } ) buttonSectionName.x = cx + 120 buttonSectionName.y = cy -165+dispLine\*38 --]] end 

Basically, the first thing I did was comment out your offsets and added the “shape” option so that I could see the background of the button (the invisible part). When I did this, you could see that with your 80 point offsets, it was actually shifting the backgrounds of the buttons in a bad way.  I also commented out the stroke on the left button because it visually made the left button taller than the right button and that added to the visual confusion.

To get this to look right, I then set physical widths for each button (230 point for the left, 40 point for the right) and set a physical height,j just for fun.  Then I figured out the value for the x location for each button. You can see from the new screenshot how the new buttons are positioned. To hide the background, simply take the “shape” option out.

You can adjust the button widths if you want the right button to be a bit wider to make it an easier touch target or if those numbers can get quite large. Just take away some width of the left button and adjust the X value of the buttons.

Rob

It looks like Rob has taken over here and is making good progress against the problem.

I’ll bow out and let Rob continue as needed.

Thanks @Rob Miracle.

Make a two file (main.lua, config.lua) micro project showing what you’re doing so we can run it and see what you’ve done.

It is too hard to give concrete assistance based on just a description.

If you like, I have a basic starter project you can download and modify: https://github.com/roaminggamer/RG_FreeStuff/raw/master/AskEd/askEdStarter.zip

When you’re done, rename the folder, zip it up, and attach it to this thread by:

  1. Clicking ‘More Reply Options’ below.

  2. Then:  attaching_files.jpg

Question: You said you’ve read and re-read the API docs and ca’t find width?

These API docs: https://docs.coronalabs.com/api/library/widget/newButton.html

Just search the page for width, then depending on button constructions…

https://docs.coronalabs.com/api/library/widget/newButton.html#width-height-optional

https://docs.coronalabs.com/api/library/widget/newButton.html#width-height-required

https://docs.coronalabs.com/api/library/widget/newButton.html#width-height-required-1

PS - In questions, when you say you’ve read XYZ docs in a question always link the docs you mean.  That way we know where you’ve looked.

In this case, you may simply have been reading a guide when you thought you were reading the API docs?

This is the API docs home: https://docs.coronalabs.com/api/

Hello Ed.

Thank you for the feedback so far.

Realizing that I am learning as I go, I understand I might be going about this entirely wrong…

I hoped I was being succinct in my post, but obviously not.  The widget.newButton - buttons I have been creating have no background - text only, so the width parameter which only applies to the ‘rect’ or ‘roundedRect’ shapes doesn’t work for me (I don’t use either).

I see a textOnly parameter, but if I set that to ‘true’ my left -align formatting reverts to centered so that doesn’t help.

For your reference: Corona Version I Am Using: 2017.3184
                               OS I am building on: Windows 7 at work, and Windows 10 at home.

                                        - both environments exhibit the same symptoms
                               Target Device(s) I am Testing On - Corona Simulator only at this time
                               Target OS Version: Android 8.0.0 when I get to that stage…

I have copied the code verbatim from my working.lua module to your main.lua in the attached .zip file…   But it does not run in the main.lua - throws no error, but does nothing.  I’m sorry, but I don’t know enough yet to debug why it doesn’t work in main.lua.    I also edited your config.lua to match the parameters in my config.lua.

I have included a .png image of my working scene for your reference in the .zip file - it is called ‘scene.png’ - you will see my layout and hopefully the problem from that…  (please excuse the wanky name - it is an in-joke at work)

I an trying to build a list of items with a corresponding bin-location…     Temporarily I have colored the items yellow, and the bin-location white in an effort to determine what was happening with the button width, (but to no avail.)

I have also included the comma-separated-values .txt file of data I load in the module.

When I tap on the Item, I want it to change to ‘selected’, and if I tap on the bin-location, I want to be able to edit the details . - Hence why I want two buttons per entry line, but the button widths do not seem to match the text width, for example, If I click on the ‘p’ in Impellor, the adjacent ‘1’ activates. - Obviously the ‘1’ button width is far greater than the text width.

Also on this scene, I have four ‘control’ buttons…  ’ ^ '(scroll up),  ’ v '(scroll down), ‘Add Item’ and ‘Back’ which all work as intended.    The buttons for these ‘control’ items do not seem to match the text width either (they are all somewhat wider), but at least they do not overlap.   I’m a bit stumped as to what I can do to resolve this, and would appreciate any pointers you could give.